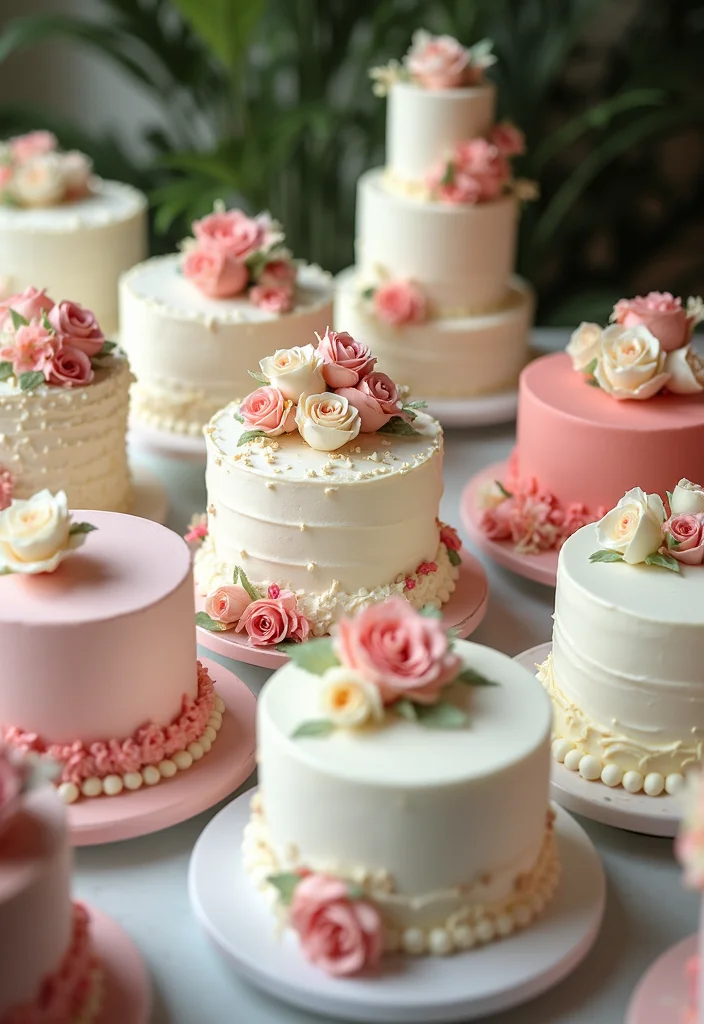
Weddings, anniversaries, and special gatherings all call for a stunning reception cake. If you’re planning an event, you know how important it is to impress your guests. That’s why I created this post—to showcase some of the most unique reception cake designs out there. You want something that’s not only delicious but also visually stunning. Nothing captures attention quite like a cake that’s a work of art!
This guide is perfect for anyone who loves events and celebrations. If you’re a bride-to-be, a wedding planner, or someone who just wants to throw an unforgettable party, you’re in the right place. You might be looking for cake designs that are a little different from the traditional options. You want flavors and styles that will leave a lasting impression on your guests.
Here, you’ll discover 15 unique reception cake designs that will wow everyone at your event. From colorful confetti cakes to elegant vintage lace creations, there’s something for every taste. Each idea comes with inspiration that can help you choose the perfect cake for your gathering. Plus, you’ll find practical tips on flavors, decorations, and presentation. So get ready to make your cake the centerpiece of your celebration!
Let’s dive in and explore these amazing designs that are sure to delight your guests. And trust me, you won’t want to miss the spotlight on #7!
Key Takeaways
– Check out the Floral Wonderland Cake for a classic, elegant touch that features real flowers.
– The Geode Cake brings a stunning, jewel-like appearance that’s perfect for a modern celebration.
– For a trendy option, consider the Naked Cake, which shows off delicious layers and fresh fruits.
– If you’re after a playful vibe, the Rainbow Cake will add color and cheer to your reception.
– Don’t overlook the Chocolate Mousse Cake, a rich, decadent choice that chocolate lovers will adore.
1. Floral Wonderland Cake

Picture a cake that seems to bloom right before your eyes! The Floral Wonderland Cake is a stunning centerpiece, adorned with cascading edible flowers and lush greenery. Each tier can surprise your taste buds with different flavors, like rich chocolate on the bottom, zesty lemon in the middle, and classic vanilla on top. Not only is this cake a feast for the eyes, but it also delivers a symphony of flavors that will leave your guests raving!
Here’s how to create your own Floral Wonderland Cake:
Ingredients:
3 cups all-purpose flour
2 cups sugar
1 1/2 cups unsalted butter, softened
6 eggs
1 cup milk
1 tablespoon baking powder
1 teaspoon vanilla extract
Edible flowers and greenery for decoration
Instructions:
1. Preheat your oven to 350°F (175°C).
2. Cream together the butter and sugar until light and fluffy.
3. Add eggs, one at a time, mixing well after each addition.
4. Stir in milk and vanilla extract.
5. Gradually mix in the flour and baking powder until just combined.
6. Pour the batter into greased cake pans and bake for 25-30 minutes.
7. Allow cakes to cool completely before frosting.
8. Decorate with edible flowers and greenery to your liking.
FAQs:
Can I use real flowers? Only if they’re pesticide-free and edible!
How far in advance can I make the cake? Baking can be done up to three days ahead to ensure freshness.
This Floral Wonderland Cake is not just a dessert; it’s a stunning piece of art that will enhance your special day!


2. Geode Cake
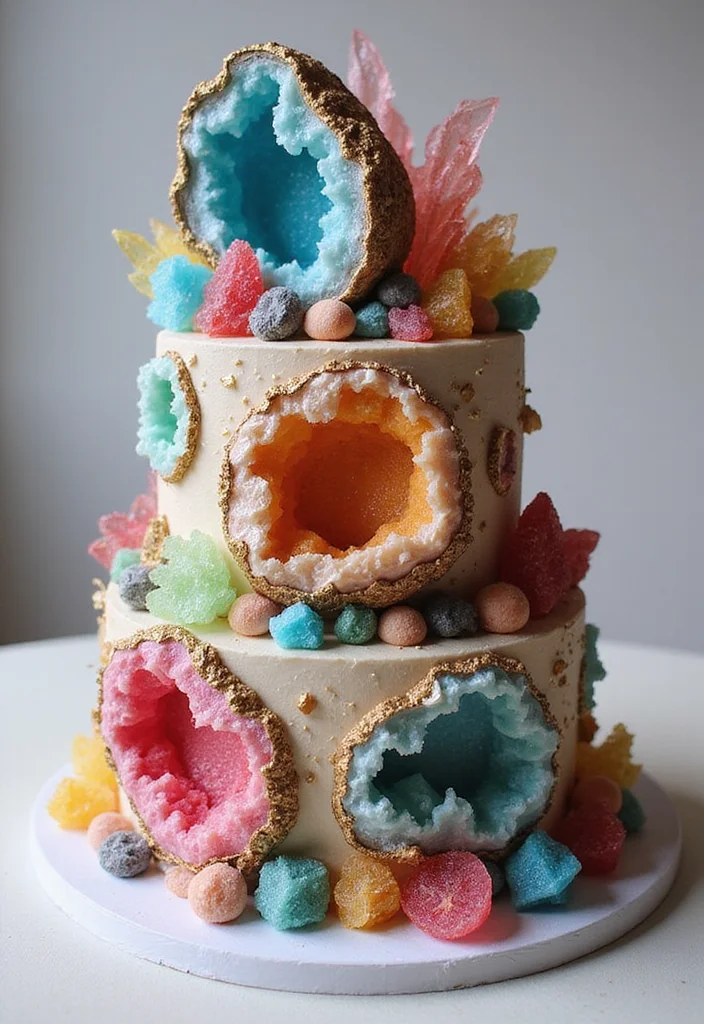
Want to add a touch of glamour to your celebration? The Geode Cake does just that! This stunning design mimics the look of sparkling crystals, making it a perfect fit for those who appreciate elegance and nature. Imagine a rich red velvet base, embellished with vibrant purple and blue rock candy that resembles geodes. Your guests will be captivated by this eye-catching centerpiece!
Let’s dive into making your own Geode Cake:
Ingredients:
4 cups all-purpose flour
2 cups sugar
2 cups unsalted butter, softened
8 eggs
1 cup buttermilk
2 tablespoons cocoa powder (for color)
Rock candy in various colors for decoration
Instructions:
1. Preheat your oven to 350°F (175°C).
2. Beat butter and sugar together until light and fluffy.
3. Add eggs one at a time, mixing well.
4. Stir in buttermilk and cocoa powder until smooth.
5. Pour batter into greased pans and bake for 25-30 minutes.
6. Once cooled, stack the cakes and frost them.
7. Use melted chocolate or royal icing to create a base for the rock candy.
8. Decorate with rock candy to form geode shapes.
FAQs:
Can I customize the colors? Absolutely! Use food coloring for your desired shades.
How can I store a geode cake? Keep it in a cool place, avoiding moisture to prevent melting the candy.
This cake not only looks fabulous but also adds a fun and interactive element to your celebration!


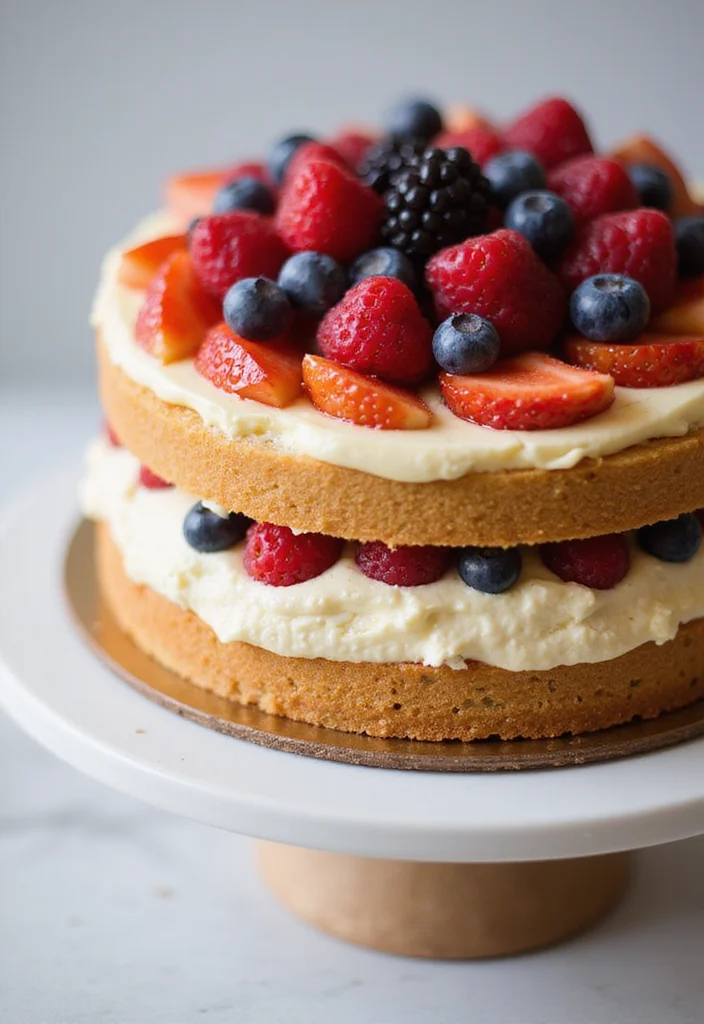
3. Naked Cake
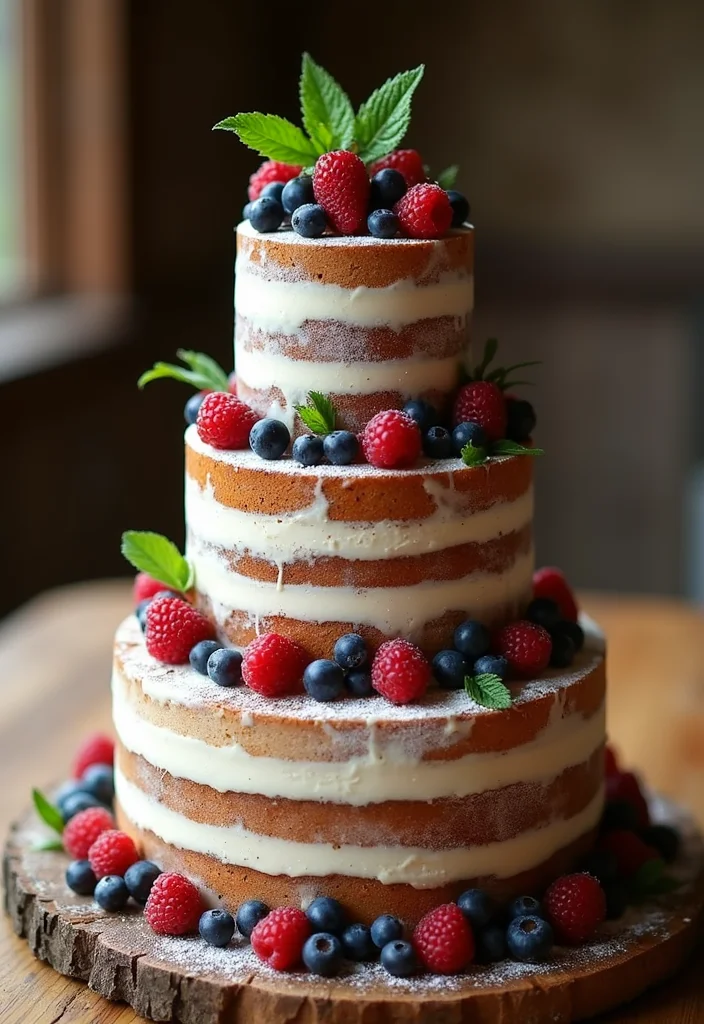
If you love a minimalist look, the Naked Cake is for you! This style allows the natural beauty of the cake to shine through. With no heavy frosting, the layers and fillings are on display, creating an intimate and rustic vibe. Top it off with fresh fruit, flowers, or herbs for added flavor and charm. Picture a lemon cake filled with berries and lightly dusted with powdered sugar!
Here’s how to make your own Naked Cake:
Ingredients:
4 cups all-purpose flour
2 cups sugar
1 1/2 cups unsalted butter, softened
6 eggs
1 cup buttermilk
1 tablespoon baking powder
Fresh berries and mint for decoration
Instructions:
1. Preheat the oven to 350°F (175°C).
2. Cream the butter and sugar until fluffy.
3. Add eggs and buttermilk, mixing well.
4. Gradually incorporate the flour and baking powder until smooth.
5. Divide the batter into cake pans and bake for 25-30 minutes.
6. Once cooled, stack the layers without heavy frosting in between.
7. Garnish with fresh fruit and herbs and dust with powdered sugar.
FAQs:
Does it need to be refrigerated? It’s best to keep it cool and covered.
Can I use different flavors? Absolutely! Mix and match according to your taste.
This Naked Cake offers a fresh, organic feel that’s perfect for your celebration!


4. Ombre Cake
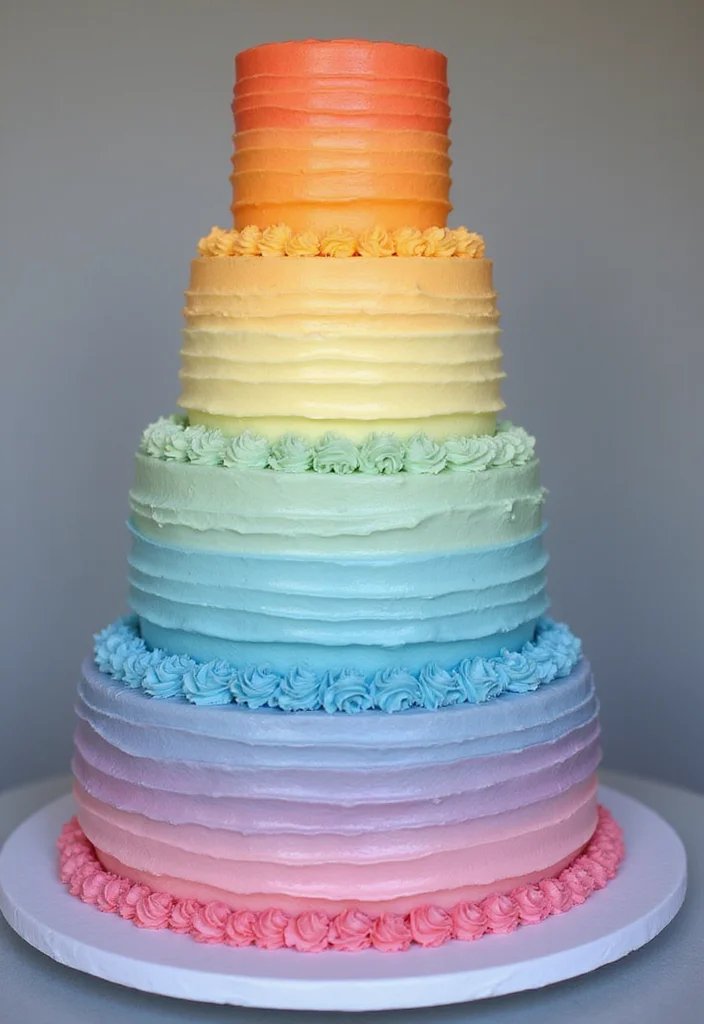
Ombre cakes create a stunning visual effect with their beautiful gradient colors. Imagine a cake that transitions smoothly from dark to light shades, making it a showstopper! This design can reflect your wedding colors or match your floral arrangements. A moist vanilla cake filled with berry compote topped with a gradient frosting will wow your guests!
Ready to make your own Ombre Cake? Here’s how:
Ingredients:
3 cups all-purpose flour
2 cups sugar
1 1/2 cups unsalted butter, softened
6 eggs
1 cup milk
1 tablespoon baking powder
Food coloring (various shades)
Instructions:
1. Preheat the oven to 350°F (175°C).
2. Cream butter and sugar until fluffy.
3. Add eggs and milk, mixing until smooth.
4. Divide the batter and color with food dye for your desired shades.
5. Layer the colors in cake pans, starting with the darkest.
6. Bake for 25-30 minutes. Once cooled, stack and frost with a gradient.
7. Use a spatula to blend the frosting for a seamless ombre effect.
FAQs:
Is ombre difficult to achieve? Not at all! Just practice blending colors.
Can I choose any colors? Of course! Get creative with your palette.
The Ombre Cake is a beautiful way to add a personal touch to your wedding!


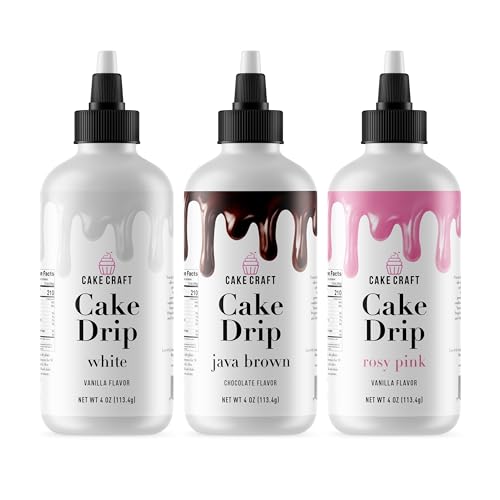
5. Drip Cake
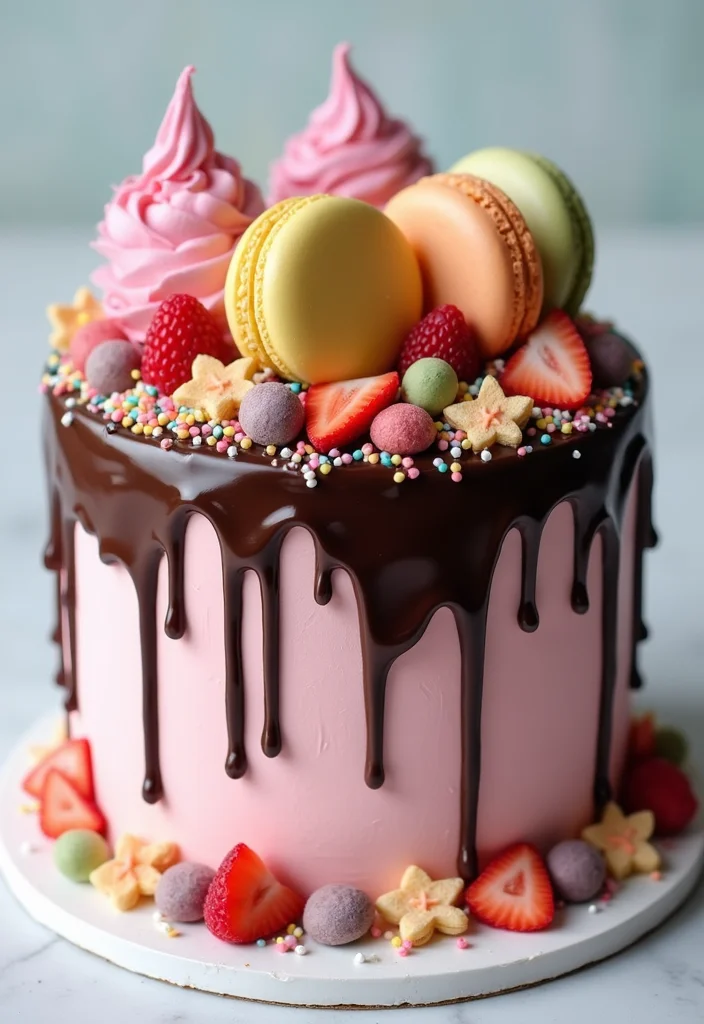
Add a playful twist to your wedding with a Drip Cake! This cake features rich ganache dripping down the sides, creating a fun and modern look. Imagine a luscious chocolate cake layered with mousse and topped with colorful drips, macarons, or edible glitter. This design is both delicious and highly photogenic, perfect for social media moments!
Here’s how to create your own Drip Cake:
Ingredients:
3 cups all-purpose flour
2 1/2 cups sugar
2 cups unsalted butter, softened
6 eggs
1 cup milk
1 tablespoon baking powder
1 cup chocolate ganache (for the drip)
Instructions:
1. Preheat the oven to 350°F (175°C).
2. Beat butter and sugar until fluffy; add eggs and milk.
3. Gradually mix in flour and baking powder until smooth.
4. Bake for 25-30 minutes. Cool completely.
5. Layer the chocolate mousse between the cakes and frost the outside.
6. Prepare the chocolate ganache and let it cool slightly.
7. Drizzle ganache over the top, allowing it to drip down the sides.
8. Decorate with macarons, sprinkles, or fresh fruit.
FAQs:
Can I customize the drip? Yes! Use white chocolate or colored ganache.
How do I store it? Keep it in a cool area to avoid melting drips.
A Drip Cake not only satisfies sweet cravings but also serves as a visual delight for your guests!


6. Vintage Lace Cake
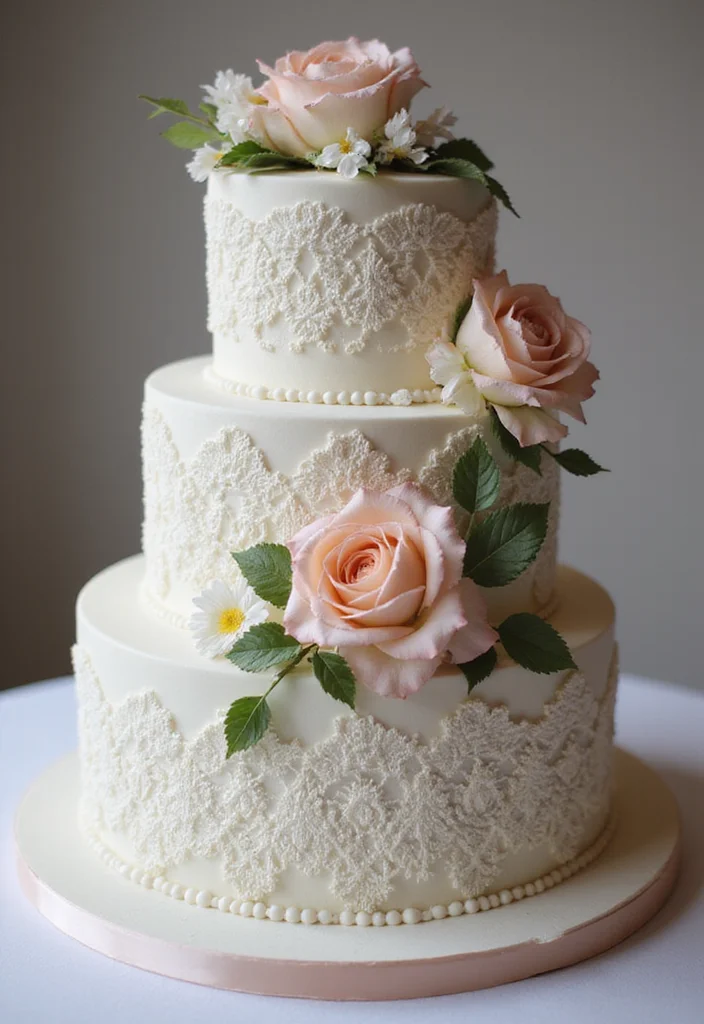
Bring a touch of elegance to your wedding with a Vintage Lace Cake! This style features intricate lace designs made from fondant, adding a beautiful texture. A classic almond-flavored cake with raspberry filling and a smooth buttercream frosting creates a delicious combination. The delicate lace detail adds a timeless charm that will enhance any vintage-themed wedding!
Let’s make your own Vintage Lace Cake:
Ingredients:
3 cups all-purpose flour
2 cups sugar
1 1/2 cups unsalted butter, softened
6 eggs
1 cup milk
2 tablespoons almond extract
Edible lace for decoration
Instructions:
1. Preheat your oven to 350°F (175°C).
2. Cream together butter and sugar until fluffy.
3. Mix in eggs, milk, and almond extract.
4. Gradually add flour until smooth.
5. Bake for 25-30 minutes; let cool completely.
6. Apply a layer of buttercream and place edible lace on the cake.
7. Decorate with fresh flowers and a light dusting of powdered sugar.
FAQs:
How do I make the lace? Use a lace mat or buy pre-made lace.
Can I use other flavors? Yes! Any light flavor pairs well with lace.
This Vintage Lace Cake is perfect for couples who love classic elegance!


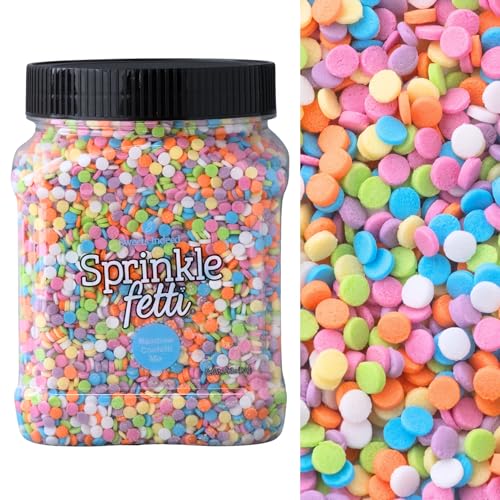
7. The Colorful Confetti Cake

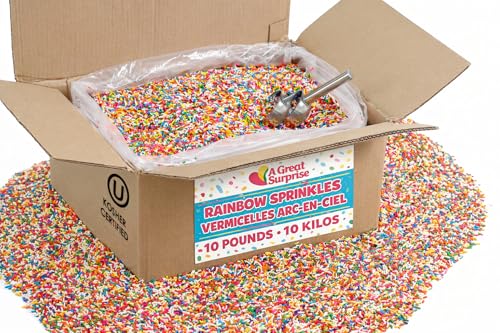
If fun and whimsy are your style, the Colorful Confetti Cake is for you! Bursting with sprinkles inside and out, this cake is sure to bring smiles to every guest’s face. Picture layers of fluffy vanilla cake with rainbow sprinkles, creamy frosting, and a vibrant sprinkle coating. It’s perfect for couples who want to add a splash of color to their wedding!
Let’s create your own Colorful Confetti Cake:
Ingredients:
4 cups all-purpose flour
3 cups sugar
1 1/2 cups unsalted butter, softened
8 eggs
1 cup milk
1 tablespoon baking powder
1 cup colorful sprinkles (plus more for decoration)
Instructions:
1. Preheat your oven to 350°F (175°C).
2. Beat butter and sugar together until fluffy.
3. Incorporate eggs one at a time and add milk.
4. Stir in flour and baking powder until smooth, then gently fold in sprinkles.
5. Distribute the batter into pans and bake for 25-30 minutes.
6. Cool the cakes completely before frosting.
7. Cover the entire cake with frosting and coat with additional sprinkles.
FAQs:
Can I use chocolate sprinkles? Absolutely! Get creative with your favorites.
Will the sprinkles bleed? It depends on moisture; use dry sprinkles for best results.
This Colorful Confetti Cake is all about joy, making it a delightful choice for your celebration!


8. Whimsical Woodland Cake
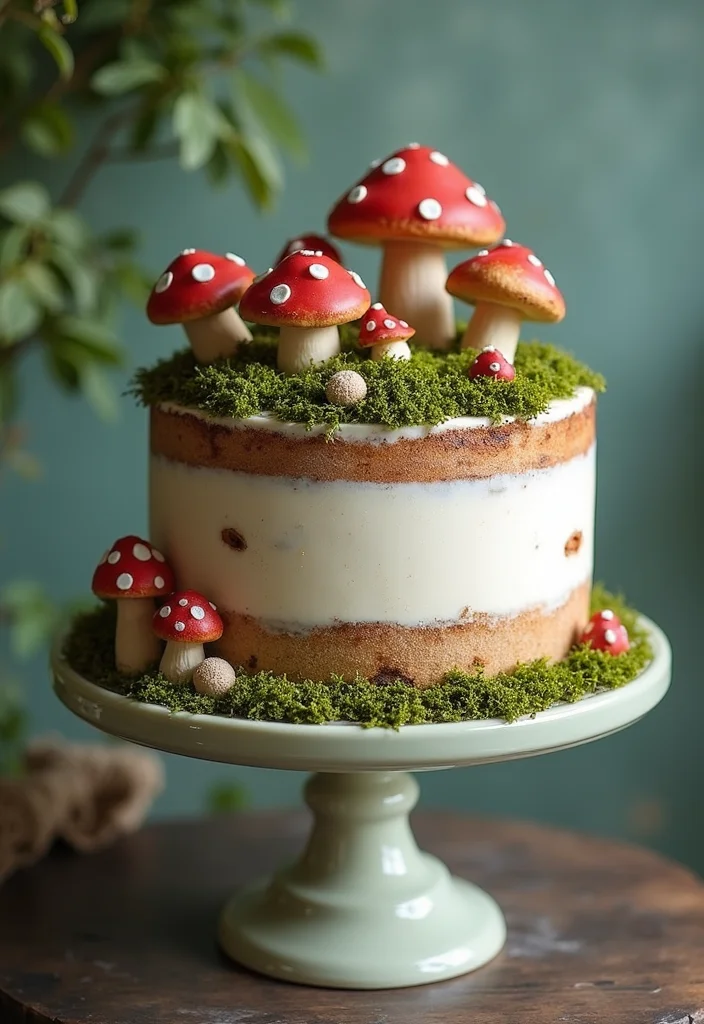
Bring a bit of nature indoors with a Whimsical Woodland Cake! This design beautifully combines natural elements like fondant mushrooms and edible moss with playful accents. Picture a moist carrot cake layered with rich cream cheese frosting and topped with forest-inspired decorations. It’s perfect for couples who adore the outdoors and want to celebrate that theme on their special day!
Here’s how to make your own Whimsical Woodland Cake:
Ingredients:
4 cups grated carrots
3 cups all-purpose flour
2 cups sugar
1 1/2 cups unsalted butter, softened
6 eggs
1 cup cream cheese (for frosting)
Edible decorations (fondant mushrooms, edible moss)
Instructions:
1. Preheat the oven to 350°F (175°C).
2. Mix grated carrots, sugar, and eggs until well combined.
3. Gradually add flour, mixing until smooth.
4. Bake for 25-30 minutes, then cool completely.
5. Frost the layers with cream cheese frosting.
6. Decorate with fondant mushrooms and edible moss.
FAQs:
How should I store the cake? Keep it cool, as cream cheese is perishable.
Can I add other flavors? Feel free to mix in nuts or spices for a unique twist.
This Whimsical Woodland Cake captures the beauty of nature, making your celebration even more delightful!
Fun fact: Woodland-inspired reception cakes with fondant mushrooms and edible moss boost photo views by about 40% at weddings. Pro tip: keep the palette natural, layer textures, so guests feel outdoorsy even indoors on your special day.


9. Marbled Cake
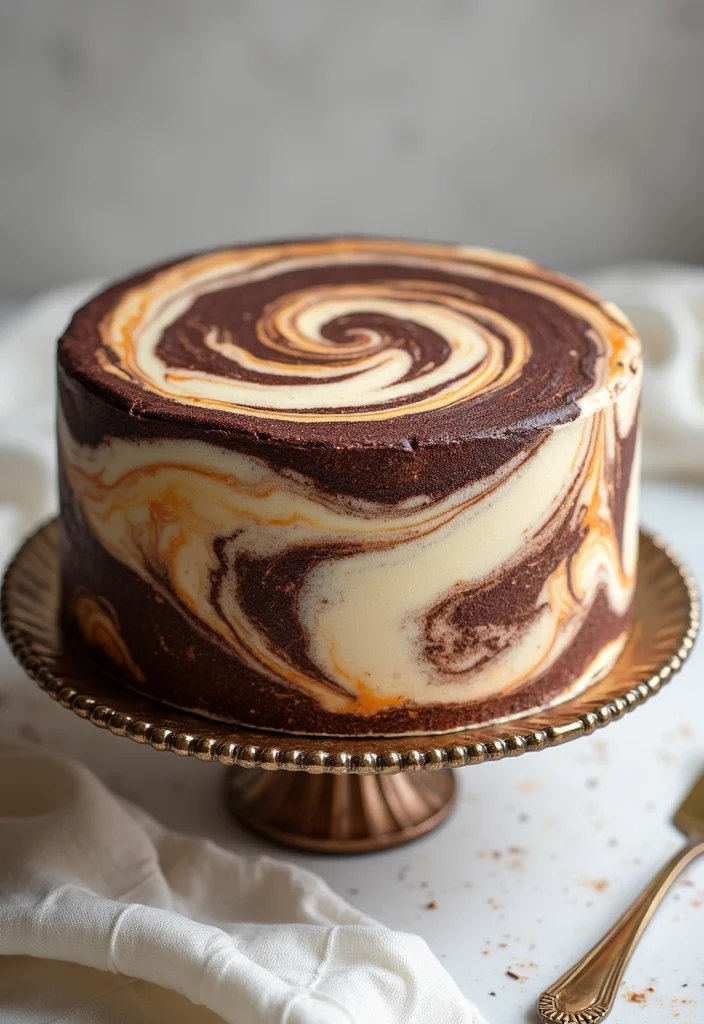
The Marbled Cake is a feast for the eyes and palate! With its stunning swirl of colors, this cake combines chocolate and vanilla layers for a delicious surprise. Perfect for any wedding theme, it can be dressed up with elegant frosting or kept simple. Imagine a marble cake finished with shiny ganache—a beautiful blend of flavors and aesthetics!
Ready to make your own Marbled Cake? Here’s how:
Ingredients:
2 cups all-purpose flour
1 1/2 cups sugar
1 cup unsalted butter, softened
5 eggs
1 cup milk
1 tablespoon baking powder
1 cup cocoa powder
Instructions:
1. Preheat your oven to 350°F (175°C).
2. Cream butter and sugar until fluffy, then add eggs and milk.
3. Divide batter into two bowls, mixing cocoa powder into one.
4. Alternately layer the batters into the pan for a swirl effect.
5. Bake for 25-30 minutes, then cool completely.
6. Frost with ganache or buttercream for added flavor.
FAQs:
Do I need to use both chocolate and vanilla? Not at all! Feel free to use any flavors you like.
How do I achieve a professional swirl? Practice is key; take your time layering the batters.
The Marbled Cake makes a stunning centerpiece, enticing guests with its flavors and design!
Fun fact: 3 reasons brides choose a Marbled Cake for their reception cake—visual wow, adaptable flavors, and simple elegance. Blend chocolate and vanilla swirls, then finish with a glossy ganache for a stunning, stress-free centerpiece.


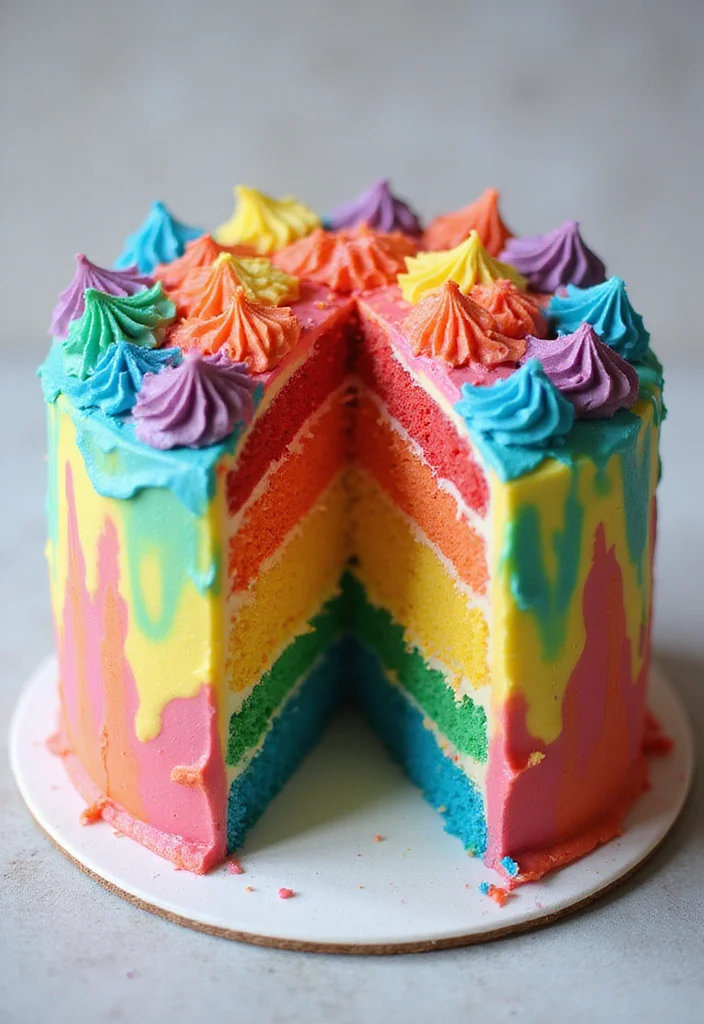
10. Rainbow Cake
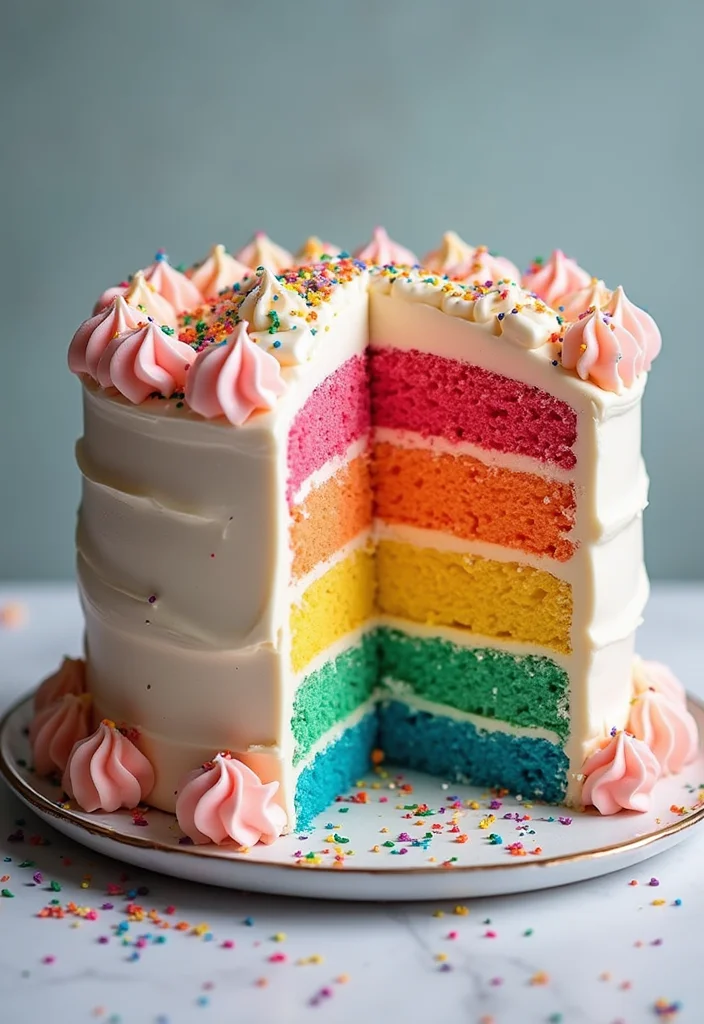
For a vibrant visual treat, the Rainbow Cake is unbeatable! With layers of colorful cake, it creates a cheerful design that’s perfect for celebrating. Typically featuring six different colored layers, this cake is filled with luscious buttercream frosting between each. It’s a fun option that delights both the eyes and taste buds!
Let’s create your own Rainbow Cake:
Ingredients:
4 cups all-purpose flour
3 cups sugar
1 1/2 cups unsalted butter, softened
8 eggs
1 cup milk
2 tablespoons baking powder
Food coloring in various shades
Instructions:
1. Preheat the oven to 350°F (175°C).
2. Cream together the butter and sugar until light and fluffy.
3. Add eggs and milk, mixing well until combined.
4. Divide the batter and color each portion with food dye.
5. Bake colored layers for 20-25 minutes and cool.
6. Stack and fill each layer with buttercream.
7. Finish with a smooth coat of frosting over the entire cake.
FAQs:
Can I use different colors? Absolutely! Get creative with your palette.
How do I store it? Keep it in a cool place and cover it to maintain freshness.
The Rainbow Cake is a joyful way to celebrate your love story!


11. Chocolate Mousse Cake
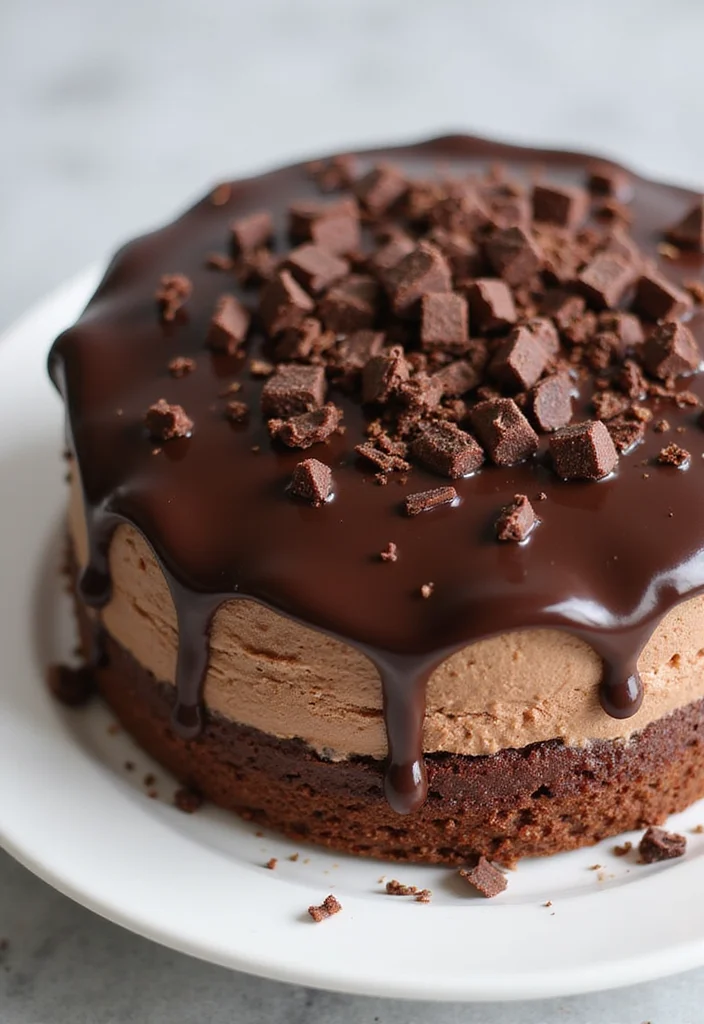
If you’re a chocolate lover, the Chocolate Mousse Cake is pure bliss! This rich dessert layers fluffy chocolate mousse with light sponge cake, creating a heavenly experience. Top it off with glossy chocolate ganache and shavings for a touch of elegance. This indulgent option is sure to impress all the chocolate enthusiasts at your reception!
Here’s how to make your own Chocolate Mousse Cake:
Ingredients:
1 cup dark chocolate
1/2 cup unsalted butter
4 eggs
1/2 cup sugar
1 cup heavy cream (for mousse)
Chocolate shavings for decoration
Instructions:
1. Preheat the oven to 350°F (175°C).
2. Melt dark chocolate and unsalted butter together.
3. Whisk in eggs and sugar until well combined.
4. Fold in whipped heavy cream for a light mousse texture.
5. Layer cake with mousse in between and top with remaining mousse.
6. Chill until set, then decorate with chocolate ganache and shavings.
FAQs:
Can I make this in advance? Yes! It’s even better the next day when flavors meld.
How should I store it? Refrigerate to keep it fresh and firm.
The Chocolate Mousse Cake is a delightful choice for those craving rich chocolate!


12. S’mores Cake
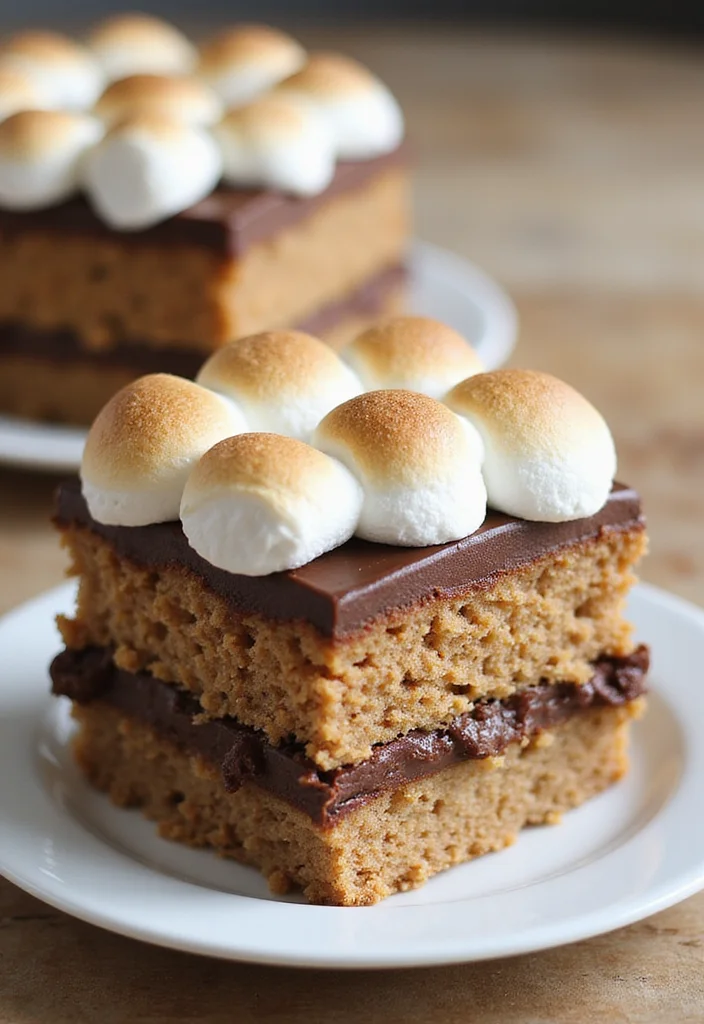
Capture childhood nostalgia with a S’mores Cake! This fun design replicates the classic campfire treat, layering graham cracker cake, chocolate frosting, and marshmallow fluff. Finish it with a toasted marshmallow topping for an authentic experience. It’s a unique choice that will have your guests reminiscing and smiling!
Let’s create your own S’mores Cake:
Ingredients:
3 cups graham cracker crumbs
1 1/2 cups sugar
1 cup unsalted butter, softened
6 eggs
1 cup milk
2 cups chocolate chips (for frosting)
Mini marshmallows for topping
Instructions:
1. Preheat your oven to 350°F (175°C).
2. Mix graham cracker crumbs and sugar, then cream with softened butter.
3. Add eggs and milk; mix until combined.
4. Bake for 25-30 minutes and cool.
5. Prepare chocolate frosting with melted chocolate chips.
6. Layer cake with frosting and mini marshmallows.
7. Toast marshmallows on top for garnish.
FAQs:
For a stronger graham flavor, can I add more crumbs? Yes!
Should I toast marshmallows just before serving? Yes, to maintain freshness.
The S’mores Cake combines sweetness and nostalgia, ensuring a crowd-pleaser!
13. Tie-Dye Cake
Spice up your wedding with a Tie-Dye Cake! This funky design incorporates vibrant colors in a mesmerizing swirl pattern. Each slice reveals a hidden rainbow, adding a fun surprise for your guests. A vanilla or lemon cake base works beautifully, and you can use buttercream frosting to keep it light and bright. It’s perfect for couples with creative spirits!
Here’s how to create your own Tie-Dye Cake:
Ingredients:
3 cups all-purpose flour
2 cups sugar
1 1/2 cups unsalted butter, softened
6 eggs
1 cup milk
Food coloring in various shades
Buttercream frosting
Instructions:
1. Preheat the oven to 350°F (175°C).
2. Cream together butter and sugar until fluffy.
3. Add eggs and milk, mixing until smooth.
4. Divide the batter and color with food dye.
5. Layer the colors in the pans and swirl gently for beautiful patterns.
6. Bake for 25-30 minutes; cool completely.
7. Frost with buttercream and decorate as desired.
FAQs:
Can I use gel food coloring for bold results? Yes!
How can I make it interactive? Allow guests to choose their slice based on color!
The Tie-Dye Cake is a fun way to express your personality!

14. Cheesecake Cake
Combine two favorites into one with a Cheesecake Cake! This creative twist layers rich cheesecake between fluffy cake layers, offering a delightful mix of textures and flavors. Opt for a classic New York cheesecake paired with vanilla cake for a delicious balance. Top it off with fresh fruit or a drizzle of caramel for added flair. This dessert is sure to please cake and cheesecake lovers alike!
Here’s how to make your own Cheesecake Cake:
Ingredients:
2 cups cream cheese
1 cup sugar
1/2 cup sour cream
2 eggs
2 cups vanilla cake mix
Fresh fruit or caramel for topping
Instructions:
1. Preheat your oven to 325°F (160°C).
2. Mix cream cheese and sugar until smooth, then add sour cream and eggs.
3. Pour cheesecake batter into a springform pan and bake for 45 minutes.
4. Cool the cheesecake completely before layering with cake mix baked according to package instructions.
5. Assemble layers with cheesecake in between and frost as desired.
6. Top with fresh fruit or caramel for presentation.
FAQs:
How can I ensure smooth mixing? Make sure the cream cheese is softened.
Should I chill the cake overnight? Yes, for better texture.
The Cheesecake Cake is a delightful dessert that combines the best of both worlds!
15. Sweetheart Cake
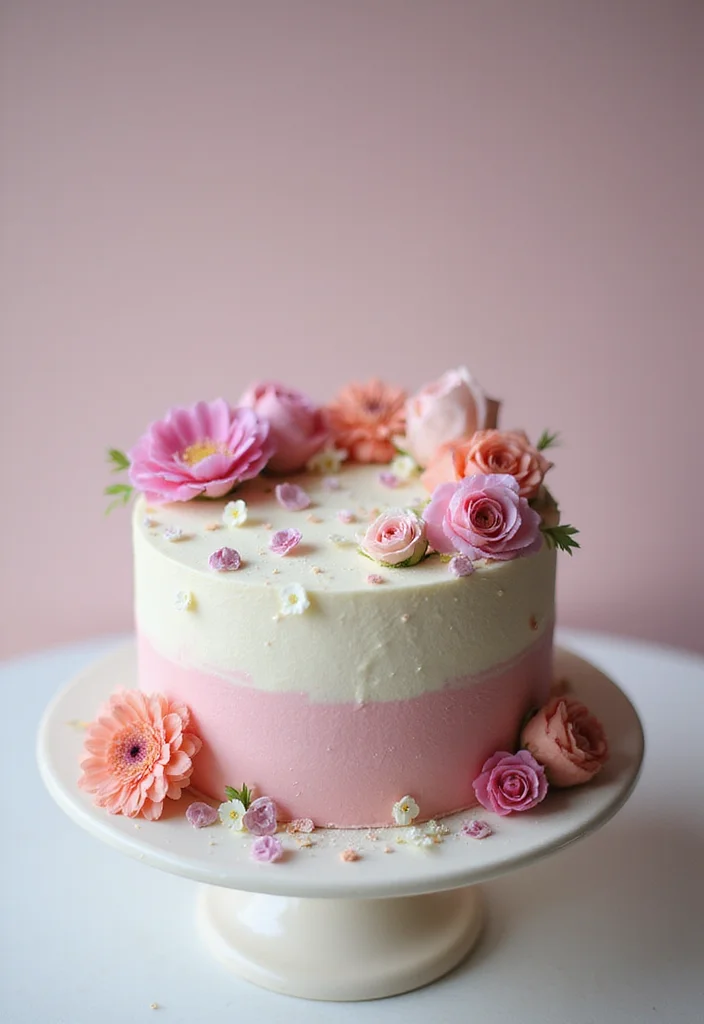
Finish your cake journey with the Sweetheart Cake, a romantic design perfect for celebrating love. This cake features soft hues and delicate floral decorations, symbolizing the beauty of your union. A luscious strawberry-flavored cake can be paired with smooth cream cheese frosting for a sweet balance. It’s the perfect way to encapsulate your love story in cake form!
Here’s how to create your own Sweetheart Cake:
Ingredients:
3 cups all-purpose flour
2 cups sugar
1 1/2 cups unsalted butter, softened
5 eggs
1 cup milk
2 cups strawberry puree (for flavor and color)
Edible flowers for decoration
Instructions:
1. Preheat your oven to 350°F (175°C).
2. Cream the butter and sugar together until fluffy.
3. Add eggs and milk, mixing until well combined.
4. Fold in strawberry puree, then add flour until smooth.
5. Bake the cake for 25-30 minutes and cool completely.
6. Frost with cream cheese frosting and decorate with edible flowers.
FAQs:
Can I use fresh strawberries for the puree? Yes, for the best flavor!
Should I add a hint of lemon zest? Yes, for a fresh kick.
This Sweetheart Cake embodies love and joy, making it a perfect ending to a beautiful celebration!
Fun fact: The Sweetheart Cake’s romantic design, with soft hues and delicate florals, boosts share-worthy photos by up to 60%. A strawberry-flavored layer paired with cream cheese frosting wins over guests every time. Keep it personal, and your reception cake tells your love story deliciously.


Conclusion
Choosing the perfect reception cake is more than just picking a delicious flavor; it’s about reflecting your personality and celebration style. From whimsical designs to elegant patterns, the options are endless. As you plan your wedding, let these unique cake ideas inspire you to create a centerpiece that not only looks good but also tastes amazing. Your reception cake will be one of the highlights of the day, so make sure it tells your story!
Which cake design captured your eye? Share your favorites in the comments below; we’d love to hear your thoughts!
Frequently Asked Questions
What Are Some Trending Reception Cake Designs for 2023?
If you’re looking for inspiration, 2023 has brought some exciting trends in reception cake designs. Think elegant ombre effects, unique geometric shapes, and even floral elements that bring a touch of nature indoors.
Don’t forget about personalization! Custom designs that reflect the couple’s story or interests are also making waves this year. Explore these ideas to wow your guests!
How Can I Choose the Perfect Flavor for My Reception Cake?
Choosing the right flavor for your reception cake can be a delightful challenge! Start by considering your personal favorites and any dietary restrictions among your guests.
Popular choices include classic vanilla and rich chocolate, but don’t shy away from unique flavors like lemon lavender or red velvet. Remember, a tasting session with your baker can help you find the perfect match that balances taste and design!
How Many Tiers Should My Reception Cake Have?
The number of tiers on your reception cake can depend on several factors, including guest count and the overall aesthetic you want to achieve. Typically, a two-tier cake serves around 50 guests, while a three-tier can serve up to 100.
Consider a larger cake for a grand display, or opt for a smaller cake with additional sheet cakes to serve guests. Whatever you choose, make sure it aligns with your vision!
Can I Customize My Reception Cake Design?
Absolutely! Customizing your reception cake design is a fantastic way to make it unique to your event. Discuss ideas with your baker about themes, colors, and personal touches, like cake toppers or edible images.
Many bakers are excited to bring your vision to life, so don’t hesitate to share your creative ideas and inspirations!
What Should I Consider When Planning a Reception Cake Budget?
When planning your budget for a reception cake, think about factors like size, complexity of design, and flavor. Custom cakes can vary significantly in price based on these elements.
It’s also wise to factor in delivery and setup costs. Setting a clear budget and discussing it with your baker can help ensure you get the stunning cake of your dreams without breaking the bank!
Related Topics
reception cake
cake designs
wedding cakes
unique flavors
themed cakes
elegant desserts
creative cake ideas
easy recipes
showstopper cakes
seasonal flavors
party planning
guest favorites