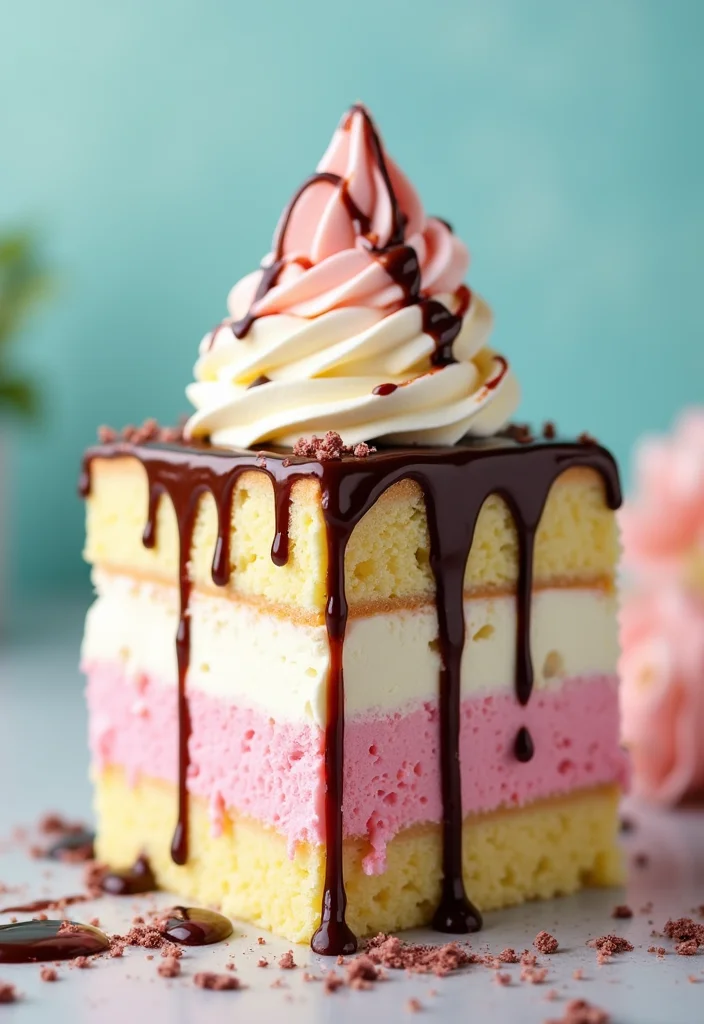
Baking a cake is more than just following a recipe; it’s an art form. If you’ve ever found yourself scrolling through Instagram, double-tapping on those stunning cake designs, you’re not alone. With so many dekorasi cake trends popping up, it can be overwhelming to know how to make your cakes stand out. That’s why I created this post! I want to share the latest creative cake decor trends that will inspire you and elevate your baking game.
Whether you’re a seasoned baker or just starting your journey into the world of cake decorating, you’ll find something here that sparks your interest. If you love the thrill of trying new artistic techniques or simply want your desserts to wow your friends and family, this list is for you. These trends are not just pretty; they bring a fresh twist to your baking routine.
In this article, you’ll discover 16 exciting cake decor ideas that range from the whimsical to the trendy. Imagine crafting eye-catching geode cakes or experimenting with interactive designs that surprise your guests. Each trend offers unique techniques that are easy to learn and implement. So grab your baking tools and get ready to transform your cakes into show-stopping masterpieces!
Let’s dive into these creative cake decor trends and see which ones resonate with your style. And trust me, you won’t want to miss what’s in store for #8—it’s a game changer!
Key Takeaways
– Explore the allure of geode cakes, which feature striking crystal-like sugar decorations.
– Learn how brush stroke cakes use vibrant colors to create a painterly effect that’s visually stunning.
– Discover the charm of whimsical woodland themes, incorporating natural elements like edible flowers and greenery for a rustic touch.
– Get inspired by interactive cakes, designed to engage guests with hidden surprises or pull-apart features.
– Master the art of layered and skewered cakes, which add height and dimension, making your cake display more impressive.
1. Geode Cakes
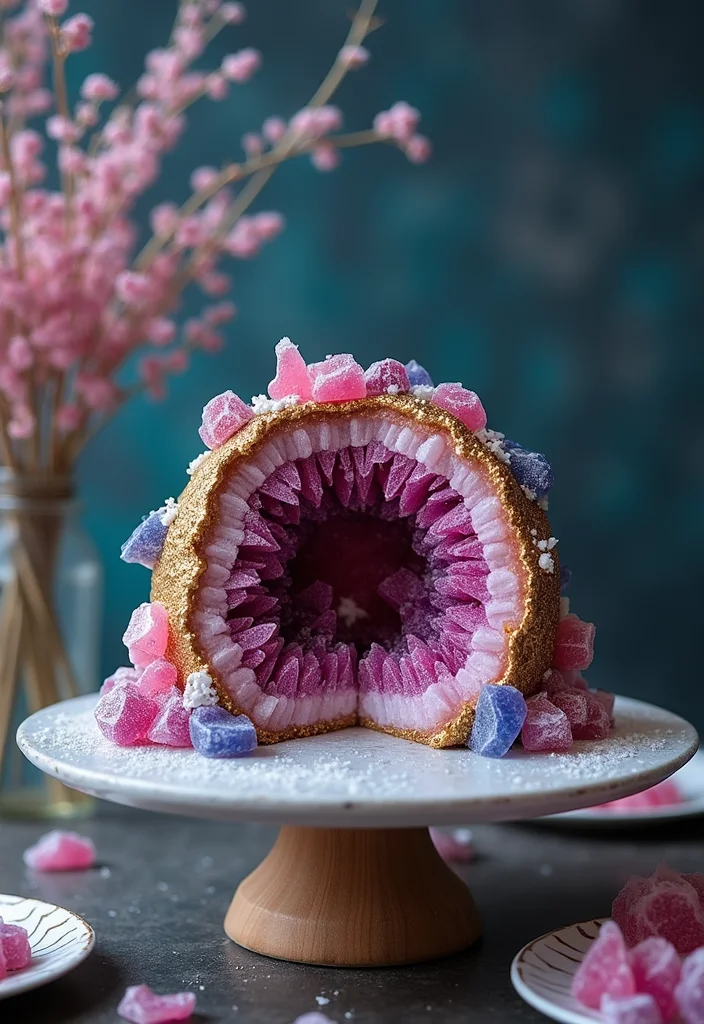
Geode cakes are like a slice of nature on your dessert table! They mimic the stunning beauty of natural geodes, using colorful rock candy and edible crystals. Imagine deep blues, vibrant golds, and shimmering purples all coming together to create a dazzling cake that impresses everyone. Each cut reveals a mix of textures and colors that are sure to amaze your guests. To start with this artistic cake, layer your buttercream or fondant to shape the geode.
Here are some handy tips:
– Use a serrated knife to craft jagged edges.
– Choose flavored rock candy for a tasty surprise.
– Add edible glitter for extra sparkle.
Whether it’s for a birthday or wedding, geode cakes let your creativity shine!
Recipe Overview:
– Servings: 12
– Prep Time: 2 hours
– Cook Time: 30 minutes
– Total Time: 2.5 hours
Ingredients:
– 2 cups flour
– 1 ½ cups sugar
– 1 cup butter
– 4 eggs
– 1 cup milk
– 2 tsp baking powder
– Rock candy and edible glitter for decoration.
Instructions:
1. Preheat your oven to 350°F (175°C).
2. Cream butter and sugar until light and fluffy.
3. Add eggs one by one, mixing well after each.
4. Combine flour and baking powder, then add milk for a smooth batter.
5. Bake in prepared pans for 30 minutes. Cool completely before decorating.
6. Use the knife to create the geode shape, then decorate with rock candy and glitter.
– For a realistic geode, use various sizes of rock candy.
– Chill the cake before adding decorations to help them stick.
FAQs:
– Can I use different types of candy? Yes! Try gummies or chocolate.
– What’s the best flavor for a geode cake? Chocolate or vanilla are great choices, but feel free to get creative!


2. Brush Stroke Cakes
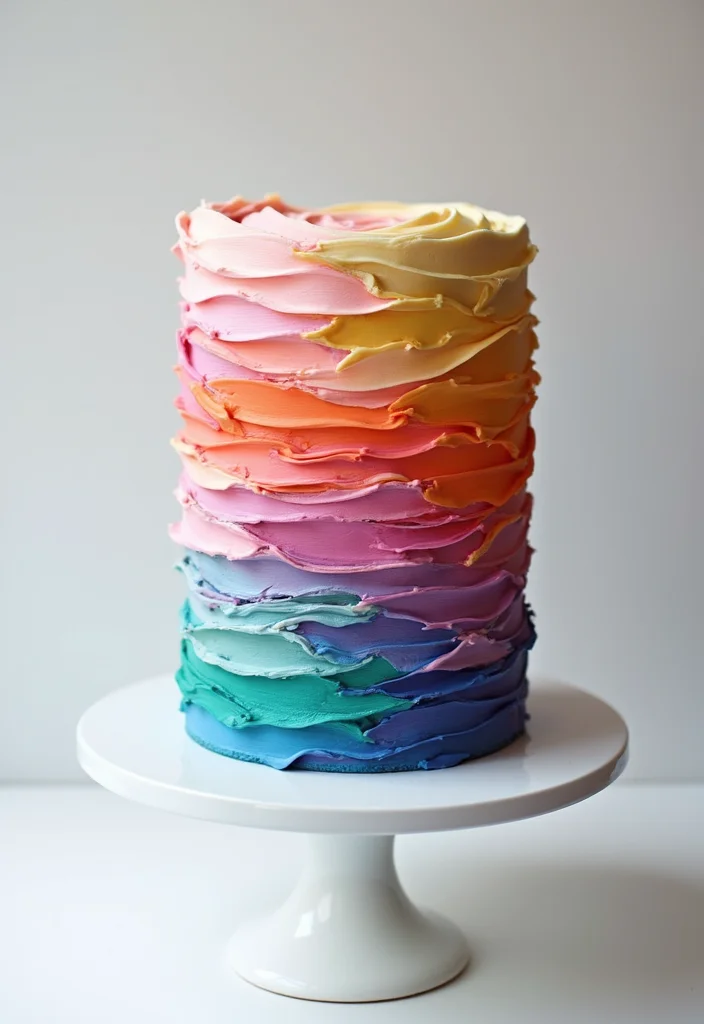
Do you love a painterly aesthetic? Then brush stroke cakes are perfect for you! These cakes feature bold strokes of color, giving your dessert an artistic and modern look. With a spatula or brush, you can create beautiful buttercream strokes that blend into a watercolor effect. The simplicity and elegance make it suitable for any occasion!
Here’s how to master this stunning design:
– Select a color palette that fits your event.
– Start with a smooth crumb coat and chill it.
– Use an offset spatula to apply your colors in strokes for depth.
This cake will surely be a conversation starter!
Recipe Overview:
– Servings: 10
– Prep Time: 1 hour
– Cook Time: 25 minutes
– Total Time: 1.5 hours
Ingredients:
– 3 cups of cake flour
– 2 cups of sugar
– 1 cup of butter
– 1 cup of milk
– 5 eggs
– Food coloring in your favorite shades.
Instructions:
1. Preheat the oven to 350°F (175°C).
2. Cream butter and sugar until fluffy.
3. Add eggs one at a time, then mix in milk and flour.
4. Bake for 25 minutes, then let cool completely.
5. Apply a crumb coat and chill the cake.
6. Use a spatula to spread colored buttercream in brush strokes.
– Use a variety of colors for a vibrant appearance.
– Blend colors gently for a seamless look.
FAQs:
– Can I use fondant? Yes, but buttercream gives a more textured effect.


3. Whimsical Woodland Themes
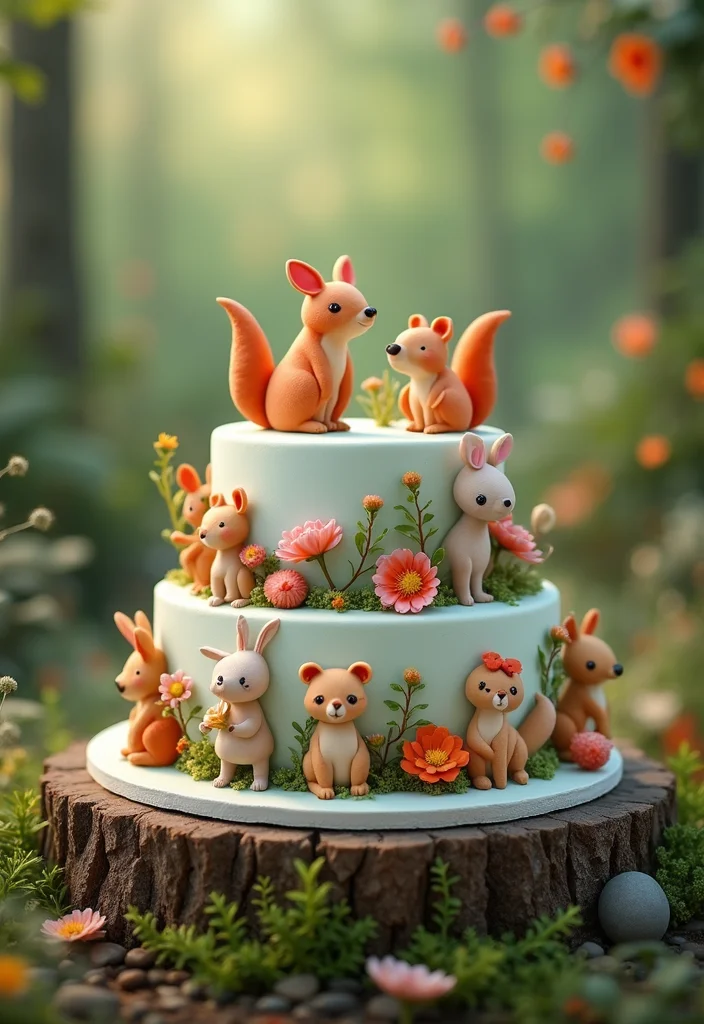
Bring a touch of nature to your celebrations with whimsical woodland-themed cakes! These delightful creations include edible flowers, cute animals, and charming trees, turning your dessert into a magical scene. Using natural colors like browns, greens, and soft pastels makes this cake perfect for children’s parties or rustic weddings!
Here’s how to craft your enchanting woodland cake:
– Start with a simple round cake as the base.
– Use fondant to create adorable animals like foxes or owls, and place them among edible flowers.
– Add a tree trunk design with chocolate ganache to enhance the realism.
This cake is sure to capture hearts!
Recipe Overview:
– Servings: 15
– Prep Time: 1.5 hours
– Cook Time: 30 minutes
– Total Time: 2 hours
Ingredients:
– 2 ½ cups of flour
– 1 ½ cups of sugar
– 1 cup of butter
– 4 eggs
– 1 cup of milk
– Fondant in various colors.
Instructions:
1. Preheat your oven to 350°F (175°C) and prepare cake pans.
2. Cream butter and sugar, then add eggs one at a time.
3. Mix in flour and milk until smooth.
4. Bake for 30 minutes, then let cool completely.
5. Decorate with fondant animals, edible flowers, and ganache.
– Add edible glitter for a magical touch.
– Use real small flowers for added texture, but ensure they are safe to eat.
FAQs:
– What flavors work best? Vanilla or carrot cake fits the theme beautifully.


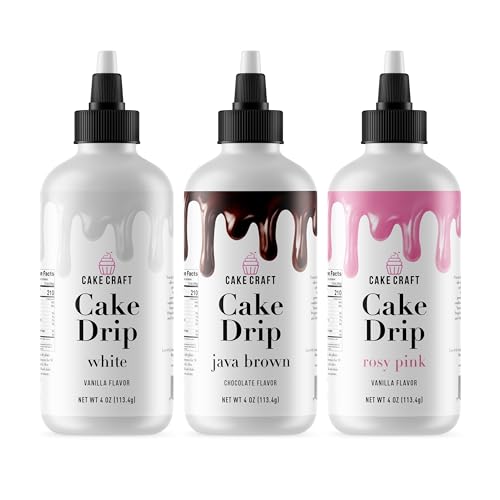
4. Drip Cakes
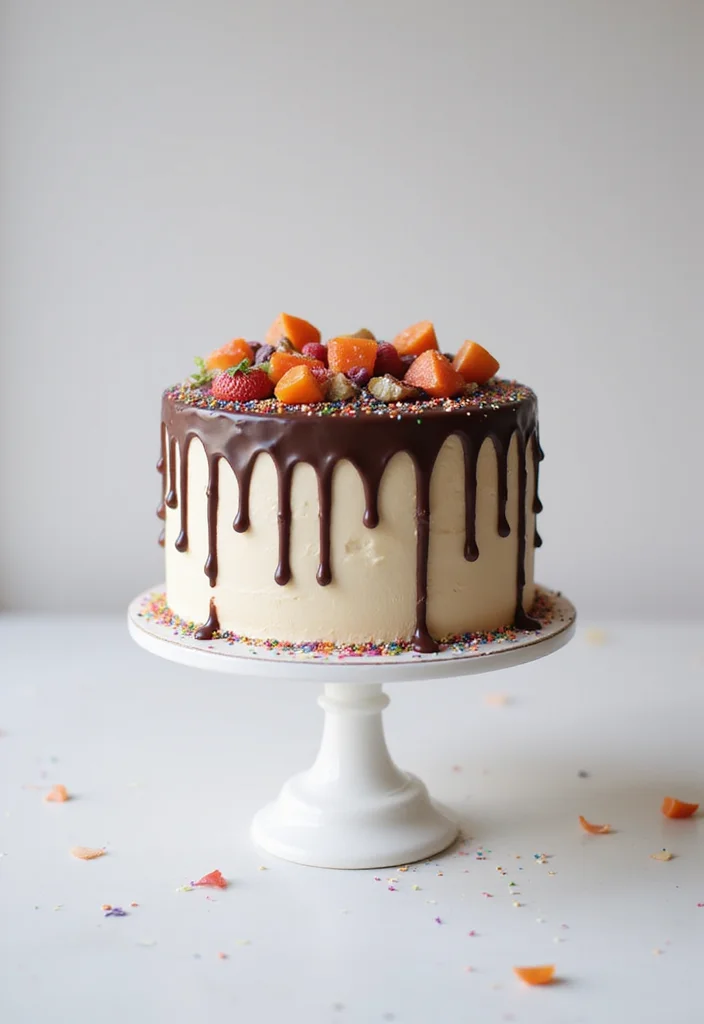
Drip cakes are a fun and eye-catching choice for any celebration! This technique involves pouring a ganache or glaze over the edges of a cake, allowing it to drip down the sides for a stunning effect. One of the best parts about drip cakes is their versatility—the drips can be made from chocolate, caramel, or colorful ganaches, giving you plenty of room to customize flavors!
Here’s how to create your own drip cake:
– Begin with a smooth iced cake.
– Make your ganache by heating equal parts cream and chocolate until melted.
– Let it cool slightly before pouring it over the top edges, allowing it to drip naturally.
This cake will be a showstopper!
Recipe Overview:
– Servings: 12
– Prep Time: 1 hour
– Cook Time: 30 minutes
– Total Time: 1.5 hours
Ingredients:
– 3 cups all-purpose flour
– 2 cups sugar
– 1 cup butter
– 4 eggs
– 1 cup buttermilk
– Chocolate for ganache.
Instructions:
1. Preheat oven to 350°F (175°C) and prepare your cake pans.
2. Cream butter and sugar, then mix in eggs one by one.
3. Combine the flour and buttermilk until smooth.
4. Bake for 30 minutes and let cool.
5. Prepare the ganache and pour it over the cake, allowing it to drip.
– Enhance flavor by adding a splash of vanilla to your ganache.
– Use a squeeze bottle for precise drips.
FAQs:
– Can I use other flavors for the ganache? Absolutely! Caramel and fruit glazes work wonderfully too.


5. Floral Buttercream Techniques
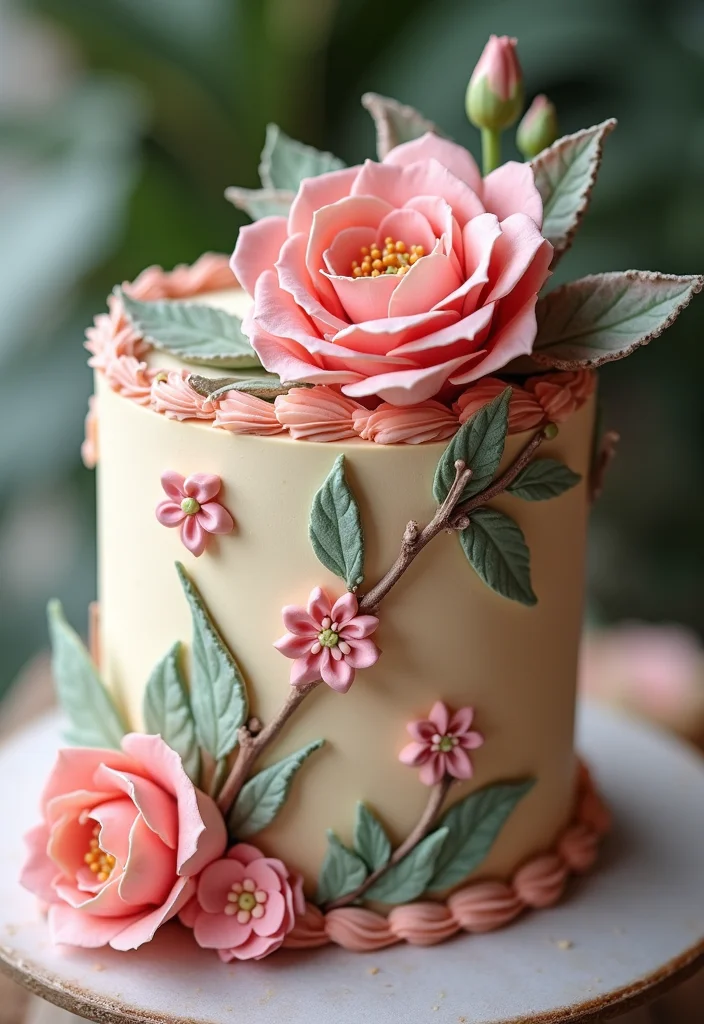
Floral buttercream techniques bring elegance to any cake! This method uses buttercream frosting to create stunning floral designs that resemble real flowers. The beauty lies in customizing your cake for any occasion, with various colors and flower types to choose from. Techniques like the Russian piping tip help you create intricate flowers with ease!
To start your floral buttercream masterpiece:
– Begin with a smooth base layer of buttercream.
– Choose your piping tips; different shapes create various flower designs.
– Pipe flowers, starting from the center and working outward for a more natural look.
This cake will surely impress!
Recipe Overview:
– Servings: 12
– Prep Time: 1 hour
– Cook Time: 30 minutes
– Total Time: 1.5 hours
Ingredients:
– 2 cups unsalted butter
– 5 cups powdered sugar
– 2 tsp vanilla extract
– Food coloring for desired hues.
Instructions:
1. Preheat oven to 350°F (175°C) and prepare your cake pans.
2. Cream butter until smooth, then gradually add powdered sugar.
3. Add vanilla and food coloring to achieve desired shades.
4. Bake your cake and let it cool completely.
5. Decorate with piped floral designs.
– Practice piping on parchment paper before applying it to the cake.
– A turntable makes decorating much easier.
FAQs:
– How long does the buttercream last? It can stay fresh for up to a week in the fridge.
Floral buttercream makes every cake feel personal—it’s practice, patience, and a little petal-worthy flair. If your frosting fights you, switch to a smaller piping tip and let the colors do the magic. When dekorasi cake is done right, tiny blooms wow.


6. Marbled Cakes
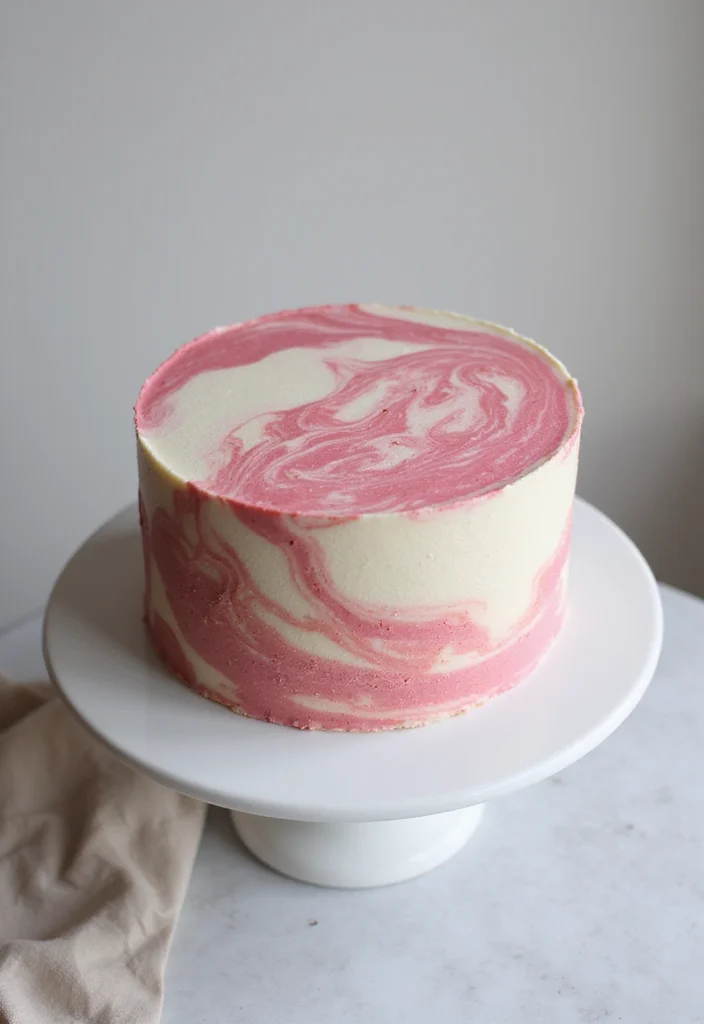
Marbled cakes bring a charming and timeless look to any dessert! Their swirled textures and blend of colors create a whimsical feel that fits any theme or occasion. The secret to achieving the marbled effect is swirling together two or more batters before baking. This technique is not only visually appealing but allows for unique flavor combinations!
Here’s how to create your marbled masterpiece:
– Prepare two different flavors of cake batter.
– Pour them into the cake pan in alternating layers, then use a skewer or knife to swirl the batters together gently.
This cake will delight everyone!
Recipe Overview:
– Servings: 10
– Prep Time: 1 hour
– Cook Time: 35 minutes
– Total Time: 1.5 hours
Ingredients:
– 2 cups of flour
– 1 ½ cups sugar
– 1 cup butter
– 4 eggs
– 1 cup milk
– Cocoa powder for chocolate batter.
Instructions:
1. Preheat your oven to 350°F (175°C) and prepare baking pans.
2. Cream butter and sugar, adding eggs one by one.
3. Split the batter into two bowls; add cocoa to one for chocolate flavor.
4. Alternate pouring batters into the pan and swirl with a knife.
5. Bake for 35 minutes, let cool, and then enjoy!
– Use contrasting flavors for an exciting twist.
– Experiment with different color combinations for a vibrant look.
FAQs:
– Can I use box mix for marbling? Yes, it works great too!


7. Metallic Accents
Elevate your cake game with metallic accents! Gold, silver, or rose gold details add luxury and glamour to any cake. Whether you prefer metallic paint, edible metallic dust, or foil, these accents can transform an ordinary cake into a stunning centerpiece. When using metallic elements, keep these tips in mind:
– Pair metallics with matte finishes for balance.
– Use edible gold leaf for an opulent touch.
– Apply metallic dust with a brush for a shimmering effect.
This cake will shine at any event!
Recipe Overview:
– Servings: 12
– Prep Time: 1 hour
– Cook Time: 30 minutes
– Total Time: 1.5 hours
Ingredients:
– 2 cups flour
– 1 ½ cups sugar
– 1 cup butter
– 4 eggs
– 1 cup milk
– Edible metallic accents.
Instructions:
1. Preheat your oven to 350°F (175°C) and grease your pans.
2. Cream butter and sugar, adding eggs gradually.
3. Mix in flour and milk until combined.
4. Bake for 30 minutes and allow to cool.
5. Apply your metallic accents after frosting.
– Use gold or silver fondant shapes for added dimension.
– Be careful not to overdo it; a little goes a long way!
FAQs:
– Are metallic decorations edible? Yes, as long as they are labeled food-safe.


8. Interactive Cakes
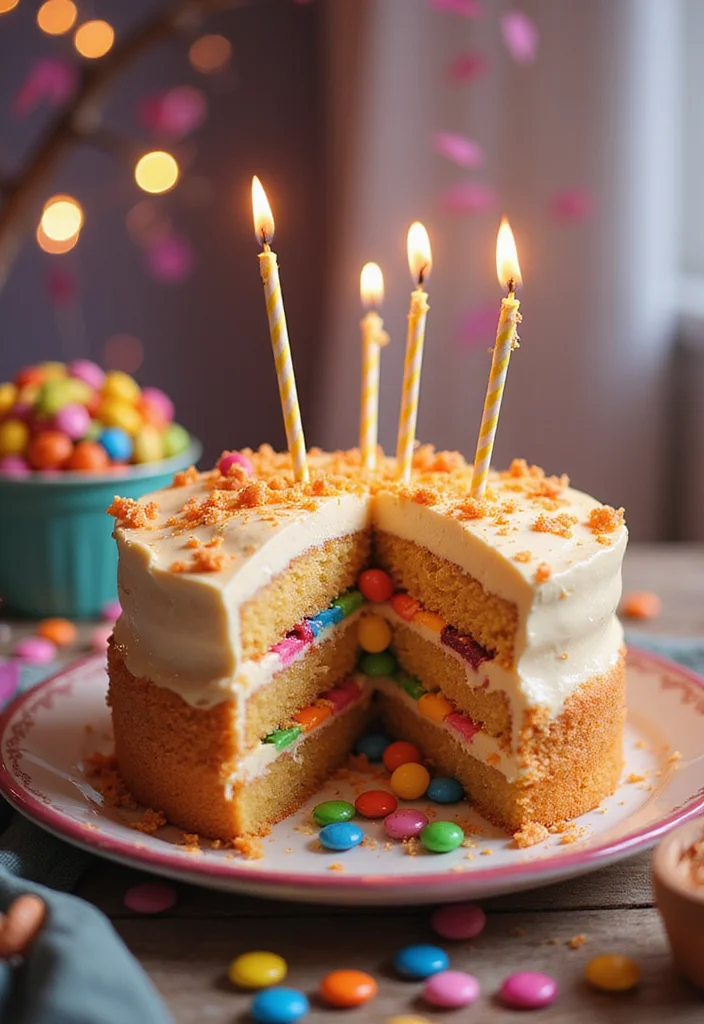
Interactive cakes are a fun trend in the cake world! These unique creations surprise guests with hidden layers of candy, pull-apart designs, or even cakes that transform before your eyes. The magic lies in the experience—the cake becomes an interactive centerpiece that brings joy and excitement. Imagine a cake that pours out sprinkles or candy when cut!
Here’s how to create your interactive masterpiece:
– Start with a basic cake and layer your favorite candies in the center.
– Create an opening on top to let guests peek at the fun inside.
– Use a clear glaze for a polished look that showcases the surprise.
This cake will be the highlight of your event!
Recipe Overview:
– Servings: 12
– Prep Time: 2 hours
– Cook Time: 30 minutes
– Total Time: 2.5 hours
Ingredients:
– 3 cups all-purpose flour
– 2 cups sugar
– 1 cup butter
– 5 eggs
– 1 cup buttermilk
– Your favorite candies (gummy bears, M&M’s, etc.).
Instructions:
1. Preheat oven to 350°F (175°C) and prepare your cake pans.
2. Cream together butter and sugar, then add eggs one by one.
3. Mix in flour and buttermilk until combined.
4. Bake for 30 minutes; cool and trim the top layer to create an opening.
5. Fill with candies and glaze it for a shiny finish.
– Choose colorful candies to make it pop!
– Ensure the cake is stable enough to hold the center weight.
FAQs:
– How early can I make this cake? It’s best enjoyed the day of to keep the fillings fresh.


9. Ombre Cakes
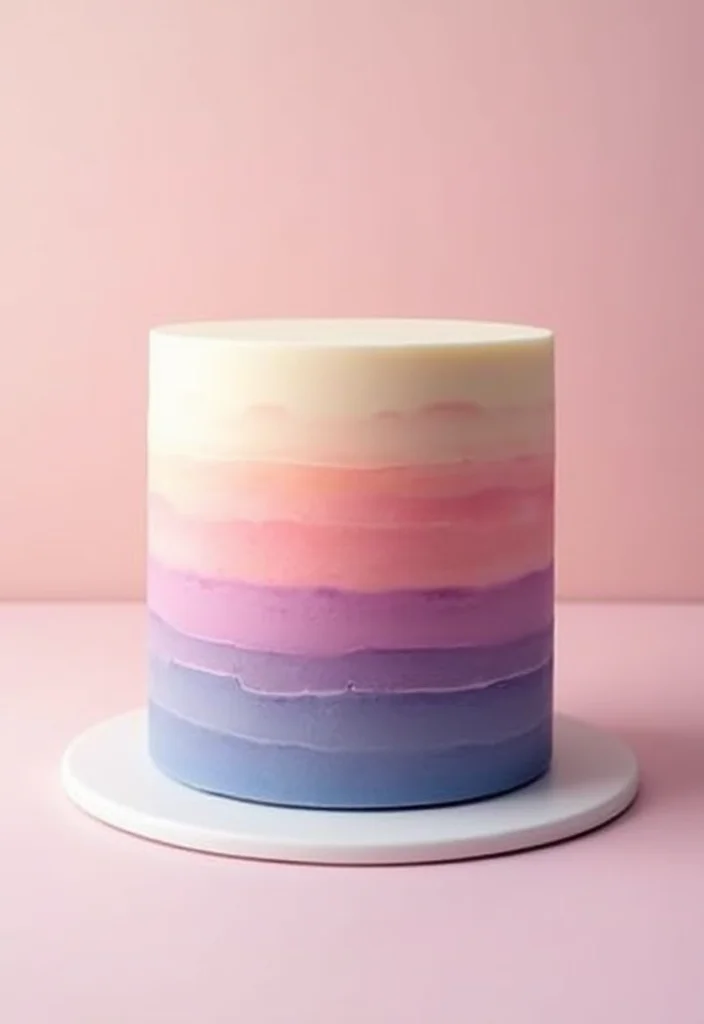
Ombre cakes are a beautiful way to show off color gradients and add dimension to your dessert! The smooth transition from one color to another creates a stunning visual effect that captures attention. To achieve the ombre effect, start with a base color and gradually mix in white or a lighter shade to create depth. This trend works wonderfully with both buttercream and fondant!
To create your ombre cake:
– Bake multiple layers of cake in different shades.
– Stack and frost each layer, blending the colors as you go.
– Finish with the lightest shade on top and sides for a polished look.
This cake will certainly impress your guests!
Recipe Overview:
– Servings: 10
– Prep Time: 1 hour
– Cook Time: 30 minutes
– Total Time: 1.5 hours
Ingredients:
– 2 ½ cups flour
– 2 cups sugar
– 1 cup butter
– 4 eggs
– 1 cup buttermilk
– Food coloring (various shades of your chosen color).
Instructions:
1. Preheat oven to 350°F (175°C) and grease your cake pans.
2. Cream butter and sugar together, adding eggs one at a time.
3. Split the batter into bowls for each color, adjusting the mix for shades.
4. Bake for 30 minutes and let cool.
5. Stack layers with frosting in between and blend the edges.
– Use a turntable for easier frosting.
– Experiment with different color combinations for a unique look.
FAQs:
– Can I use gel food coloring? Yes, gel colors are perfect for vibrant shades.


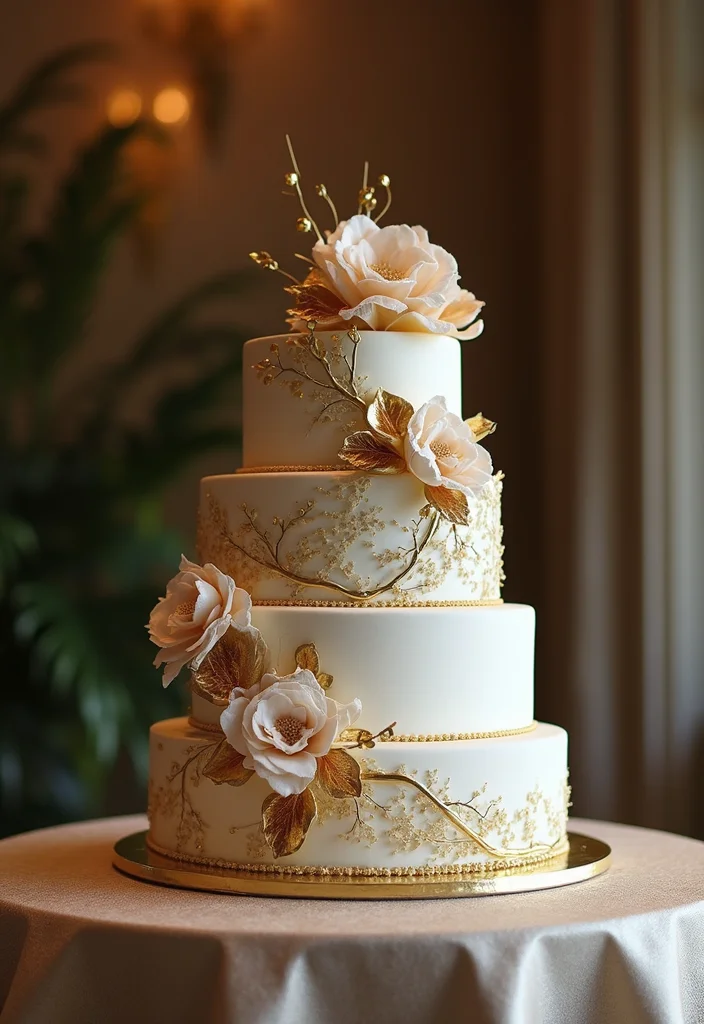
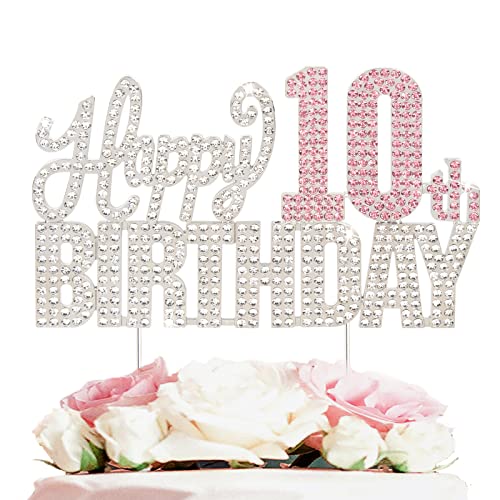
10. Cake Toppers Galore
Cake toppers have become a major trend in cake decoration! From custom acrylic pieces to whimsical figures, these elements add personality to your desserts. The beauty of cake toppers is that they fit any theme—whether it’s a simple ‘Happy Birthday’ sign or a detailed figurine of your favorite character. Choosing the right topper can elevate your cake and make it truly special!
To make a statement with your cake top:
– Choose a topper that reflects the occasion or personality.
– Think about height and color contrast to make it stand out!
This cake will be a memorable centerpiece!
Recipe Overview:
– Servings: 15
– Prep Time: 1 hour
– Cook Time: 30 minutes
– Total Time: 1.5 hours
Ingredients:
– 2 cups flour
– 1 ½ cups sugar
– 1 cup butter
– 4 eggs
– 1 cup milk.
Instructions:
1. Preheat oven to 350°F (175°C) and prepare your cake pans.
2. Cream butter and sugar together, mix in eggs one by one.
3. Combine flour and milk until smooth.
4. Bake for 30 minutes and let cool.
5. Decorate with your chosen topper.
– Personalize the topper for an extra special touch.
– Opt for edible toppers for added flavor and beauty.
FAQs:
– Where can I find unique toppers? Check online or craft stores for endless options!

11. Vintage Lace Designs
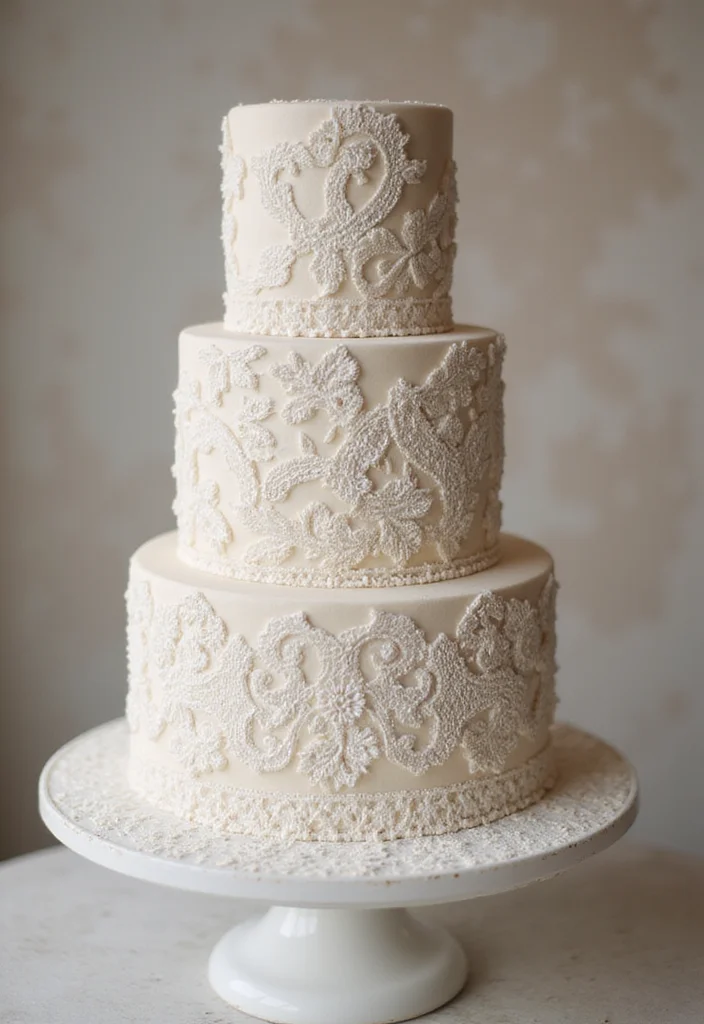
Vintage lace designs are making a stunning comeback in cake decorating! This trend embraces detailed patterns that evoke nostalgia and elegance. You can achieve lace designs through stencils or piped buttercream, allowing you to create delicate and refined touches. Pairing these lace details with soft pastel colors enhances the vintage feel, making them perfect for weddings or elegant gatherings!
To create your lace masterpiece:
– Use lace molds or stencils to imprint your designs.
– Choose a soft color palette for a refined appearance.
This cake will capture the essence of classic beauty!
Recipe Overview:
– Servings: 12
– Prep Time: 1 hour
– Cook Time: 30 minutes
– Total Time: 1.5 hours
Ingredients:
– 2 ½ cups flour
– 2 cups sugar
– 1 cup butter
– 4 eggs
– 1 cup milk.
Instructions:
1. Preheat your oven to 350°F (175°C) and prepare cake pans.
2. Cream together butter and sugar, gradually adding eggs.
3. Mix flour and milk until smooth.
4. Bake for 30 minutes, then cool.
5. Decorate with lace designs using frosting or fondant.
– Dust with powdered sugar or use luster dust for glamour.
– Practice your piping technique for the best results.
FAQs:
– Can I make lace out of fondant? Yes, fondant is excellent for creating detailed lacework.

12. Layered and Skewered Cakes
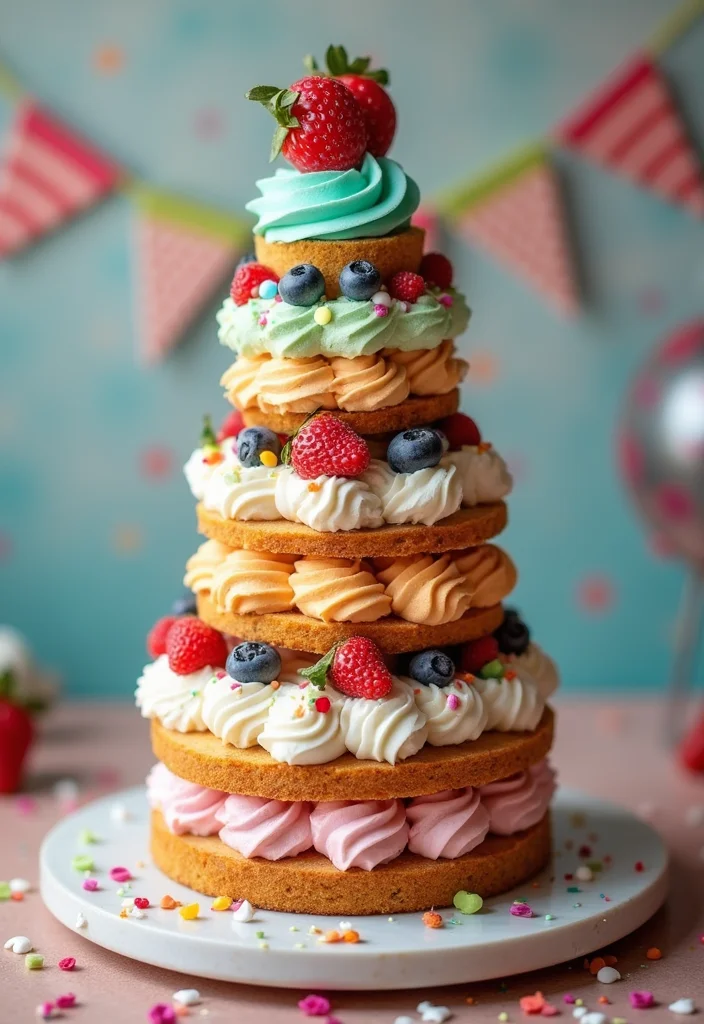
Layered and skewered cakes offer a playful twist on traditional cake designs! This approach involves stacking layers of cake and securing them with skewers, creating a fun and unique presentation. This trend incorporates different flavors and textures, providing a feast for the eyes and taste buds. It’s perfect for parties where guests can enjoy individual pieces without the fuss of formal servings!
To create a layered skewer delight:
– Stack your baked layers, alternating flavors.
– Secure each layer with skewers for stability.
This cake will be a hit at any gathering!
Recipe Overview:
– Servings: 15
– Prep Time: 1 hour
– Cook Time: 30 minutes
– Total Time: 1.5 hours
Ingredients:
– 3 cups all-purpose flour
– 2 cups sugar
– 1 cup butter
– 5 eggs
– 1 cup buttermilk.
Instructions:
1. Preheat oven to 350°F (175°C) and prepare your cake pans.
2. Cream butter and sugar, adding eggs gradually.
3. Mix in flour and buttermilk until smooth.
4. Bake for 30 minutes and cool completely.
5. Stack with skewers, alternating flavors for fun!
– Use colorful frosting for a vibrant look.
– Add fruit layers for freshness.
FAQs:
– How long can I prepare this in advance? It’s best enjoyed fresh but can be made the day before for convenience.
13. Ice Cream Cakes
Ice cream cakes are a dreamy way to combine cake and ice cream! These delightful treats are perfect for warm-weather celebrations, offering a refreshing twist that everyone enjoys. The layered design allows for endless flavor combinations, making them a hit at any party!
To create your own ice cream cake:
– Start with a layer of cake as the base.
– Layer with your favorite ice cream, letting it set between layers.
This dessert will be a crowd pleaser!
Recipe Overview:
– Servings: 12
– Prep Time: 2 hours
– Cook Time: None
– Total Time: 2 hours (plus freezing time)
Ingredients:
– 1 box of cake mix
– 1 quart of your favorite ice cream
– Chocolate syrup for drizzling.
Instructions:
1. Bake the cake according to box instructions and let it cool.
2. Once cool, layer with softened ice cream between cake layers.
3. Freeze to set, then drizzle with chocolate syrup before serving.
– Use a silicone mold for easy removal.
– Let the ice cream soften for easier spreading.
FAQs:
– How long do ice cream cakes last? They should be eaten within a week for the best flavor.
Ice cream cakes make celebrations feel breezy—layered flavors invite creativity. Pro tip: switch flavors for each layer and decorate with dekorasi cake ideas to wow guests without turning the kitchen into a meltdown!


14. S’mores Cakes
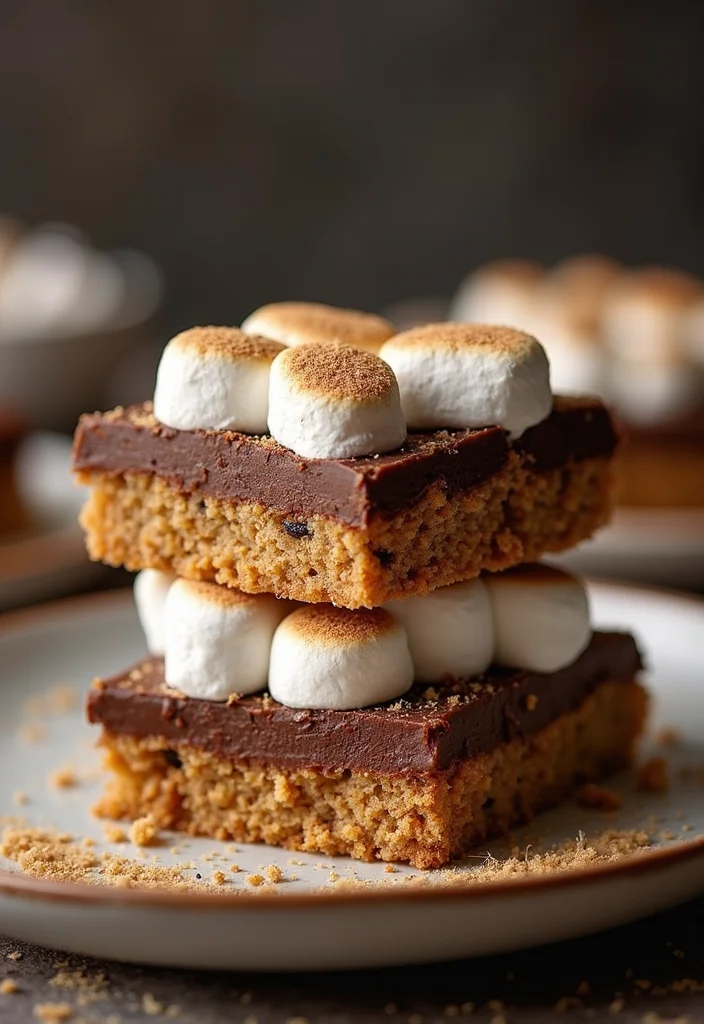
If you enjoy the campfire classic, you’ll love s’mores cakes! These delicious desserts combine chocolate cake with graham cracker crumbs and marshmallows, delivering the delightful flavors of s’mores in cake form. The layers of flavor create a nostalgic experience, perfect for summer parties or cozy gatherings!
To make this mouthwatering cake:
– Start with a chocolate cake base.
– Layer with roasted marshmallow frosting and graham cracker crumbs.
This cake will be a hit!
Recipe Overview:
– Servings: 12
– Prep Time: 1 hour
– Cook Time: 30 minutes
– Total Time: 1.5 hours
Ingredients:
– 2 cups flour
– 1 ½ cups sugar
– 1 cup butter
– 4 eggs
– 1 cup milk
– Graham cracker crumbs for decoration.
Instructions:
1. Preheat your oven to 350°F (175°C) and prepare cake pans.
2. Cream butter and sugar, adding eggs gradually.
3. Combine flour and milk until smooth.
4. Bake for 30 minutes and cool.
5. Decorate with roasted marshmallow frosting and graham cracker crumbs.
– Use a kitchen torch to toast marshmallows for the frosting.
– Add chocolate ganache for an extra rich flavor.
FAQs:
– Can I use store-bought frosting? Yes, but homemade offers the best depth of flavor.
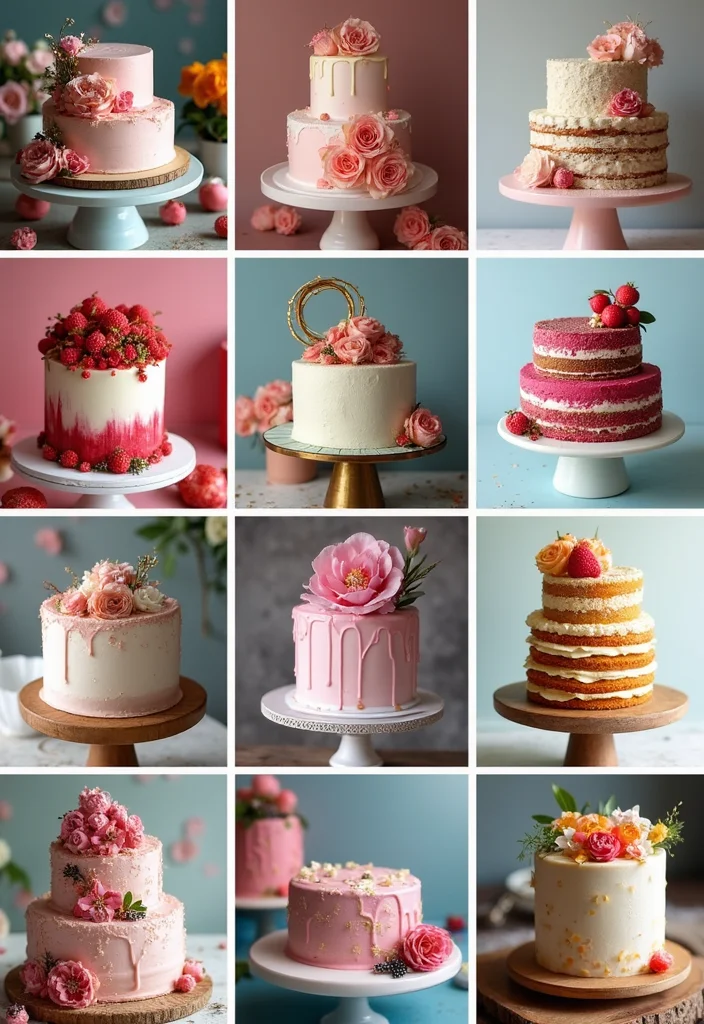
15. Simple Naked Cakes
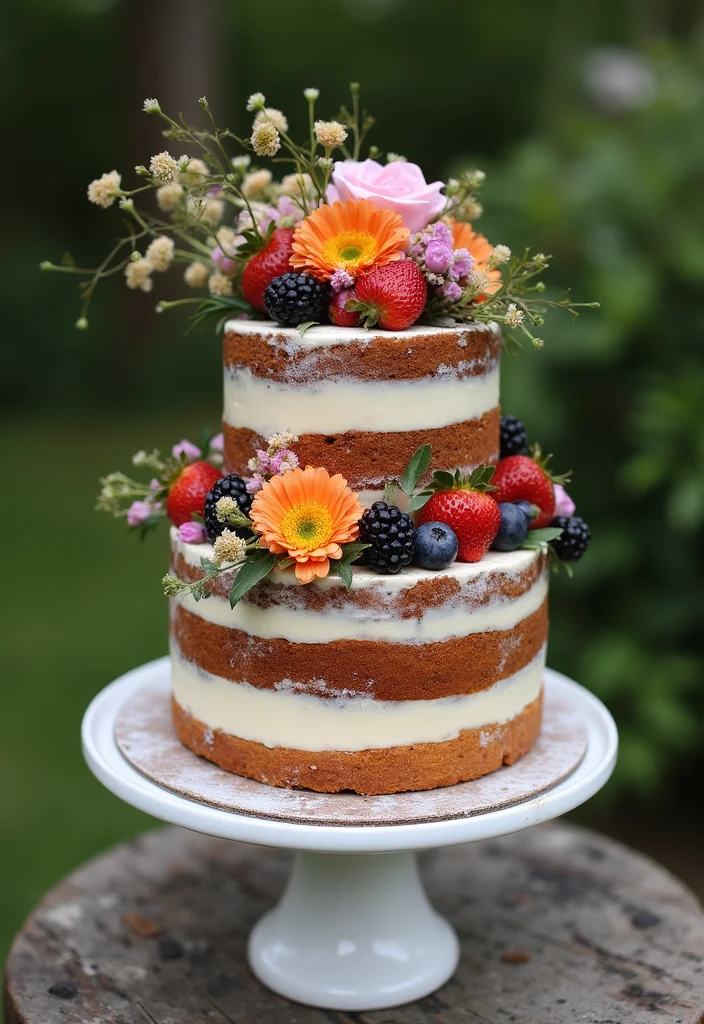
The naked cake trend emphasizes simplicity and elegance. These cakes are unfrosted on the sides, allowing the layers to show through, which creates a rustic yet charming look. You can dress them up with fresh fruit, flowers, or a light dusting of powdered sugar for a beautiful presentation. They’re perfect for informal gatherings and give off a warm, home-baked feel!
To make your naked cake:
– Prepare your favorite cake layers.
– Stack them without excessive frosting between and around them.
This cake will be a delightful addition!
Recipe Overview:
– Servings: 10
– Prep Time: 1 hour
– Cook Time: 30 minutes
– Total Time: 1.5 hours
Ingredients:
– 3 cups flour
– 2 cups sugar
– 1 cup butter
– 5 eggs
– 1 cup buttermilk.
Instructions:
1. Preheat your oven to 350°F (175°C) and prepare cake pans.
2. Cream butter and sugar, then mix in eggs one at a time.
3. Combine flour and buttermilk until smooth.
4. Bake for 30 minutes and let cool.
5. Stack layers unfrosted and decorate with fresh fruit or flowers.
– Use a variety of fruits for color.
– Keep it simple for a cleaner look.
FAQs:
– Do I need to refrigerate naked cakes? Yes, to keep them fresh, especially with cream or fruit toppings.
Fun fact: naked cakes rise in popularity by 38% in the past year, proving simplicity sells. Use fresh fruit or flowers to elevate your dekorasi cake—the beauty is in the layers showing through. Keep frosting minimal, let the natural textures shine.


16. Cake in a Jar
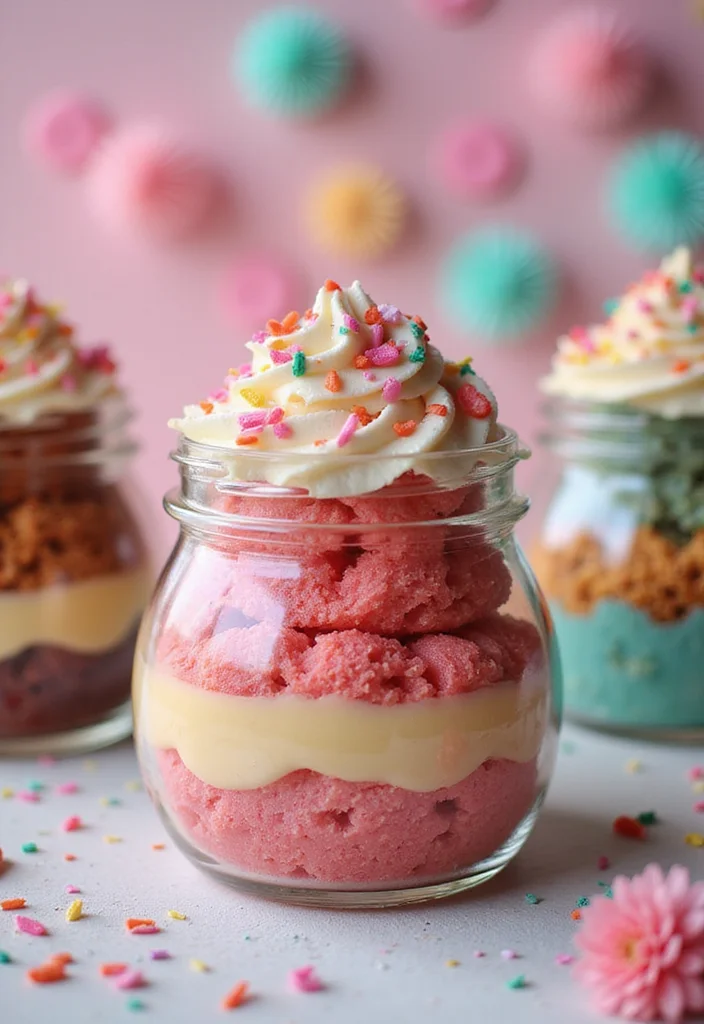
Cake in a jar is the ultimate portable dessert trend! These cute, individual servings are perfect for parties or gifts, allowing for creative layering of flavors and textures. Each jar can be customized with different cake flavors, fillings, and toppings. Plus, they’re a fun way to enjoy cake without the mess!
To start making your own cake in a jar:
– Bake your cakes and let them cool.
– Layer cake, filling, and frosting in jars.
This dessert will surely impress!
Recipe Overview:
– Servings: 12 (in jars)
– Prep Time: 1 hour
– Cook Time: 30 minutes
– Total Time: 1.5 hours
Ingredients:
– 2 ½ cups flour
– 2 cups sugar
– 1 cup butter
– 4 eggs
– 1 cup milk.
Instructions:
1. Preheat your oven to 350°F (175°C) and prepare baking pans.
2. Cream butter and sugar together, adding eggs.
3. Mix in flour and milk until combined.
4. Bake for 30 minutes; cool completely.
5. Cut the cake into pieces and layer into jars with toppings.
– Use clear jars to showcase your beautiful layers.
– Add fun elements like sprinkles or fruit between layers.
FAQs:
– How long do cake jars last? They can stay fresh for up to a week in the fridge.
Conclusion
Exploring these 16 creative cake decor trends can truly transform your baking experiences!
From geode cakes to interactive surprises, there’s a world of possibilities waiting for you.
Consider trying out these artistic techniques in your next bake, and share your delightful creations with friends and family. Remember, the joy of baking lies in the creativity you bring to the table!
Frequently Asked Questions
What Are the Most Popular Modern Trends in Cake Decorating?
If you’re curious about the latest in cake decorating, modern trends are all about creativity and personalization! Think beyond traditional designs and embrace innovative styles like watercolor effects and geode cakes. These artistic techniques not only make your cake visually stunning but also allow for unique flavor combinations that reflect your personality or event theme.
Stay updated by following cake decorators on social media, as they often showcase the hottest trends and inspiration!
How Can I Incorporate Artistic Techniques into My Cake Decor?
Incorporating artistic techniques into your cake decor can transform an ordinary cake into a masterpiece! Techniques like piping, fondant sculpting, and edible painting can add depth and creativity. Start by practicing on smaller cakes or cupcakes to build your skills. Don’t be afraid to experiment with colors and textures! Remember, the goal is to express your creativity and have fun while decorating your cakes.
Online tutorials and workshops can also be a great way to learn new artistic techniques.
What Is the Importance of Trends in Cake Decorating?
Trends in cake decorating are crucial because they reflect the evolving tastes and preferences of consumers. Staying in tune with these trends can help you create cakes that not only look great but also resonate with your audience. For instance, incorporating popular elements like floral designs or minimalist aesthetics can make your cakes more appealing for celebrations.
Plus, following trends keeps your creativity fresh and inspires you to try new ideas, ensuring your cakes stand out in a crowded market!
How Can I Choose the Right Cake Decor Trend for My Event?
Choosing the right cake decor trend for your event can seem daunting, but start by considering the theme and mood of your celebration. Are you going for a rustic vibe or something more elegant and modern? Look at current trends, but also let your personal style shine through! Think about color schemes, flavors, and even the season, as these factors can influence your choice.
Consulting with a cake decorator can also provide valuable insights and help you select a trend that aligns perfectly with your vision.
What Tools Do I Need to Start Cake Decorating?
To dive into the world of cake decorating, you’ll need some essential tools! Start with a good set of piping bags and tips for creating designs, along with offset spatulas for frosting and smoothing your cake. A cake turntable is a game changer for even decorating, and don’t forget about fondant tools if you plan to work with fondant. As you gain experience, you can expand your toolkit with additional items like edible glitter and airbrush kits to elevate your cake designs even further!
Happy decorating!
Related Topics
dekorasi cake
cake trends
artistic techniques
modern baking
whimsical designs
beginner friendly
advanced decorating
colorful frosting
minimalist cakes
seasonal themes
edible art
creative baking